


High Tech Power Pet Patio Pet Door (Original and WiFi)
- Regular price
- $1,882.00
- Sale price
- $1,882.00
- Regular price
-
- Unit price
- per


- Automatic patio pet door for sliding glass doors, easy installation with no tools required
- Low-E, dual-pane tempered glass and aluminum frame provide insulation and durability
- Flap raises automatically for pets, triggered by included MS-5 ultrasonic collar key
- Option for electrical or battery operation, ensuring uninterrupted use
- Enhanced security with automatic deadbolt locking and 4-way locking system
- Includes one collar key fob measuring just 2" wide x 1" high x 3/8" deep, so it won't weigh down your furry friend
 Product Details
Product Details
The High Tech Power Pet Patio Pet Door combines convenience, insulation, and security to provide an unparalleled solution for pet owners looking to add an electronic pet door to their sliding glass doors.
The automatic patio pet door is perfect for pets of all sizes, as it eliminates the need for them to push through a flap. Instead, the included MS-5 ultrasonic collar key activates the door, allowing it to open and close smoothly. The automatic safety retract feature ensures your pet's safety, as the door will reopen if it encounters an obstruction during closure.
The panel's Low-E, dual-pane tempered glass and robust aluminum frame ensure your home stays insulated year-round while maintaining a sleek appearance.
Enjoy peace of mind knowing your home is secure, thanks to the automatic deadbolt locking system that activates once the door is completely shut. The 4-way locking system provides additional control over your pet's access, allowing you to set specific permissions for entering and exiting your home.
Safety is paramount, and the High Tech Power Pet Door incorporates an automatic safety retract feature that reopens the door if an obstruction is encountered during closure. The deadbolt locking system and optional 4-way locking mechanism provide additional security and control over your pet's access.
With options for both electrical and battery operation, you can ensure your pet's access remains uninterrupted. Choose from an AC power outlet, AC power with battery backup, or full battery operation depending on your specific needs.
The Automatic Pet Door can be programmed using the built-in control pad at the top of the pet door.
The smartphone controlled Wifi Patio Pet Door connects to you home's wifi in order to allow you to control and program your pet door remotely via an integrated smartphone app. You can set up to 20 custom timers to control your pet's comings and goings, receive real-time notifications on your phone, and even track the number of times the door is used
Features:
- Energy-efficient Low-E, dual-pane glass and aluminum frame keep your home insulated
- Electronic door automatically opens and closes, eliminating the need for pets to push through
- Included ultrasonic MS-5 collar key allows pets to activate the door effortlessly
- Automatic safety retract feature prevents injury and reopens door if encountering an obstruction
- Secure deadbolt locking system prevents unwanted critters from entering your home
- Since the door panel weighs less than 2 lbs and closes smoothly by gravity (not motor), it will not cause any injury to your pet.
- Automatic Safety Retract feature reopens the door if it encounters an obstruction during closure.
- Automatic deadbolt locking system activates as soon as the door is completely shut, preventing raccoons and unwanted critters from accessing your home.
- Dual sensors can be separately programmed for distance for each pet.
- Includes the option of enabling a 4-way locking system (in/out only or completely locked/unlocked) for additional control over your pet's access to and from the door.
- Collar keys can be programmed to work at a range from 1 ft to 10 ft from the door (inside and outside distance can be adjusted independently). Just push the SENSORS button then turn the RANGE knob to the desired range.
Benefits:
- Energy-efficient panel ensures that your home stays insulated year-round.
- Larger sizes allow pets of differing sizes to share the pet door.
- Timid pets are suitable for this door because they do not have to use physical force to get through the pet door.
- Automatic locking system keeps strays out and improves home security.
Options for Powering the Door:
- Outlet: Comes with a UL-approved AC adapter with 5 feet cord. Plug the adapter into a nearby wall outlet for continuous operation. The pet door accepts the plug-in on either side.
- Outlet with Backup Battery: Option of purchasing a rechargeable battery for use along with your AC adapter (4' cord). In the case of a power outage, the door will automatically switch over to door battery operation, which will run on its own power. When power is restored, the AC adapter will automatically recharge the battery.
- Full Battery Operation: If an AC outlet isn't located nearby, you can operate the door on battery only. Please note that you will need to recharge the battery periodically. For this type of operation, the battery charger kit and spare battery are recommended.
Note: To Connect Using Hotspots
- The door and phone have to be connected to the same 2.4g wifi to set up the door. You should reset the door in order for it to connect.
- Once the door is set up, when at home, you have to be on the same network to use the remote control.
- When you are away from the house you cannot be connected to any wifi network. You must use your cellular data to connect.


Size Chart
- Medium8 1/4"w x 10"h
- Large12 1/4"w x 16"h
Flap Dimensions:
8 1/4"w x 10"h
The entry way your dog goes through.Overall Panel Width:
14 3/4"
How wide your panel is.


Step-Over Height:
3 3/4" - 5 3/4"
The distance from the bottom of the panel to the bottom of your flap.Flap Dimensions:
12 1/4"w x 16"h
The entry way your dog goes through.Overall Panel Width:
18 7/8"
How wide your panel is. Step-Over Height:
3 3/4" - 5 3/4"
The distance from the bottom of the panel to the bottom of your flap.| Flap Size | Flap Dimension | Overall Width | Step Over Height | Recommended Pet Height |
|---|---|---|---|---|
| Medium | 8 1/4" w x 10" h | 14 ¾" | 3 3/4" - 5 3/4" | 8" - 14" |
| Large | 12 1/4" w x 16" h | 18 7/8" | 3 3/4" - 5 3/4" | 8" - 23" |
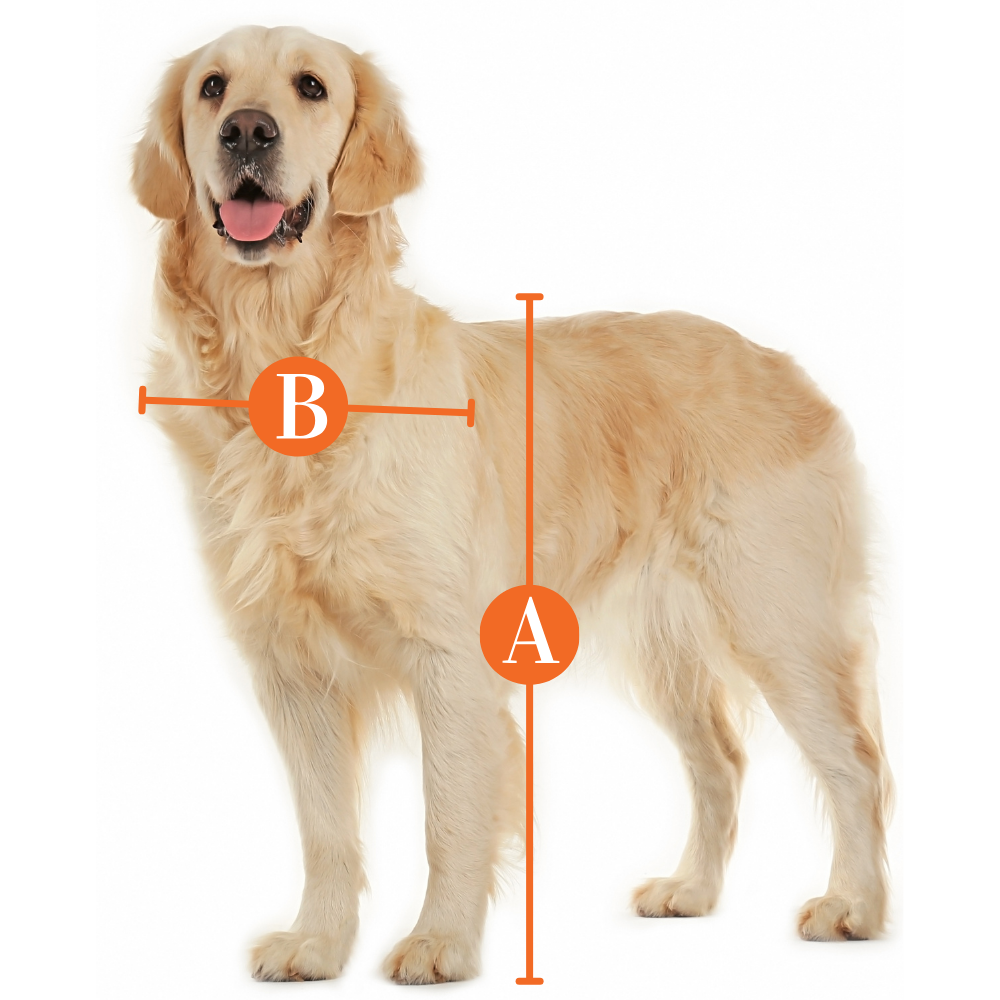
Find The Best Pet Door Size For My Pet

A
Pet Height: inches
B
Pet Width: inches
Installation Instructions

 Difficulty
Moderate
Difficulty
Moderate
 Steps
21
Steps
21
 Time Required
1-2 hours
Time Required
1-2 hours
 Sections
02
Sections
02
 Flags
00
Flags
00
Parts
- Bottom Panel Assembly with PX-2 Power Pet Door
- Top Panel Assembly
- MS-5 Collar Kit
- AC Adapter
- Range Knobs (2)
- Weather Stripping
- Draft Stopper Seal
- Section Connectors (2)
- Door Lock Housing(1)
- Lock Handle (1)
- Lock Hasp (1)
- House Lock Tab (2)
- Vacation Lock (1)
- Rectangular Hole Plug (1)
- Round Hold Plug (2)
- 1/16 Allenwrench
- 1/8 Allenwrench
- 1/4-20 X 1/2 flat head machine screw (8)
- #8 X 5/8 round head sheet metal screw (4)
- #6 X 1/2 round head sheet metal screw (6)
- #4 X 3/8 flat head sheet metal screw (4)
Tools
- Size #1 Phillips screwdriver
- Electric drill
- #32 (.117”) drill bit
- 3/32” drill bit
- 1/4 drill bit
- Scissors
- Tape Measure
- Pencil
- Safety Glasses
Please read instructions & notes thoroughly before installation.
Step 1 Measure Track

- Measure from the inside bottom of your sliding glass door track to the inside top. For short installations, remove Riser Extension.
- If your sliding glass door frame measures between 75” and 77” high, remove the Riser Extension on the Bottom Panel Assembly by unscrewing the connector screws on each side of the Riser Extension.
- The aluminum Riser Extension may be recycled.For patio doors taller than 77”, do not remove the extension.
Step 2 Insert Connectors

- Insert Section Connectors on the Bottom Frame Assembly panelusing (2)1/4-20 X 1/2 flat head machine screws for each Section Connector.
Step 3 Insert frame assembly

- Insert Top Frame Assembly on to Bottom Frame Assembly.
Step 4 Install Screws

- Install Section Connector screws. Screw panels together using (2) 1/4-20 X 1/2 flat head machine screws for each Section Connector.
Step 5 Loosen top screws

- Loosen the Top Slider set screws.
- Loosen the Top Slider locking set screws on the left and right sides of the Top Panel Assembly using the 1/8” allen wrench provided.
- If the Top Slider does not immediately release, push it up by hand so that it slides to its highest position.
Step 6 Check Lock Holes

- Make sure the lock holes in the Top Frame Assembly are facing the inside of your home.
- Position the pet door assembly into your sliding glass door frame by first inserting the pet door Bottom Panel into the bottom of your door track so that the Semicircular grooves in the pet door Bottom Panel are placed over the sliding rail at the base of your sliding glass door track.
- Tilt the pet door assembly up. Pull down on the Top Slider. Insert the Top Slider into the top of your door track and release, allowing it to move up into the top of the track.
Step 7 Install House Lock tab

- Install a House Lock Tab on the wall side of the pet door by screwing(2) #6 X ½” round head sheet metal screws into the pre-drilled holes on the pet door. Position the Tab with the open end pointing downward as shown.
Step 8 Mark Height

- Mark the height of the House Lock Tab on your sliding glass door track.
- Measure from the sliding rail at the base of your door track to a height of 46 5/8” if you are using the Riser Extension or 445/8” if you are not using the Riser Extension.
- Mark this height on the inside of your door track. Remove the tape liner from a House Lock Tab and Position the top of the non-drilled end at this mark.
Step 9 Drill Holes

- Drill (2) holes into your door track using a 1/16” drill bit.
- Screw the Lock House Tab to your door track using (2) #6 X1/2” screws.
Step 10 Install Hole Plugs

- Install a Round Hole Plug in the unused Lock Hole on the side of the pet door assembly which butts against your sliding glass door track. This is the side that does not require the lock.
- If you chose not to use the Universal Lock Assembly, install a Round Hole Plug in both Lock Knob Holes.
Step 11 Install into Track

- Slide the assembled pet door so that it buttsup against the inside of your sliding glass door track.
- Firmly grab the pet door from the inside and outside. Lift up and push against the sliding glass door track letting the House Lock Tabs engage each other as the door frame drops into its final position.
Step 12 Tighten Top Screws

- Once your Door Assembly is in place, you will have access to the Top Slider Set Screw on the side facing your sliding glass door.
- Tighten the set screw using the 1/8” Allen Wrench. This will lock the Top Slider in place.
Step 13 Insert Rectangular Hole Plug

- If you choose not to use the Universal Lock Assembly, install the Rectangular Hole Plug in the lock cavity on the open side of the assembled door panel.
- This will allow you to apply weather stripping over the cavity.If you will be installing the Universal Lock, skip this step and proceed.
Step 14 Insert Door Lock Housing

- Insert Door Lock Housing on the open side of the assembled pet door panel so that the Lock Arm is in the up position when open.
Step 15 Install Lock Handle

- Install the Lock Handle so that the handle is vertical when the lock is open (Lock Arm is in up position.) and so that one of the detents in the Lock Handle shaft aligns with the Lock Arm Set Screw.
- Turning the Lock Handle counter-clockwise should move the Lock Arm to the closed position.If the Lock Knob does not easily insert into the Lock Arm, loosen the Lock Arm Set Screw.
- Note that there are (2) detents in the Lock Knob for left and right opening door opening sliding glass doors. Make sure the handle is oriented vertically and that one of the detents aligns with the Lock Arm Set Screw.
Step 16 Tighten Lock Arm

- Tighten the Lock Arm set screw using the 1/16” Allen Wrench provided. Note that there should be a sight gap between the Lock Knob and the patio pet door panel when the unit is assembled correctly.
Step 17 Insert Lock Hasp

- Insert the Lock Hasp into the Door Lock Housing. Note that the Lock Hasp must be held vertically with the longer section uptop. Turn the Lock Handle counterclockwise so that the Lock Hasp is trapped in the Door Lock Assembly.
- Then, remove the protective liner from the tape on the back of the Lock Hasp.
Step 18 Close Patio Door

- Slide your patio door closed so that the Lock Hasp tape makes contact and affixes to the sliding glass door. Turn the Lock Handle clockwise, releasing the Lock Hasp and open your sliding glass door.
- The Lock Hasp should now be affixed to your sliding glass door.
Step 19 Drill Holes

- Using the 3/32”drill bit drill (2) holes within the slots of the Lock Hasp. Attach the Lock Hasp to your sliding glass door with (2) #6 X 1/2 round head sheet metal screws.
Step 20 Install Weatherstripping

- Peal the adhesive backing from the first 2 inches of the weather stripping.
- Starting at the bottom, apply the weather stripping to the inside edge of the open side of the assembled door panel removing the adhesive backing as you move up.
- If using the Universal Lock Assembly, cut at the bottom of the lock and restart above the lock. Continue to the top of the Top Frame Assembly and cut.
Step 21 Install Draft Stopper

- You will need to apply the Draft Stopper seal to the inside of your sliding glass door to seal the opening between your sliding door and the stationary glass.
- Start at the top of your sliding glass door and apply the seal removing the adhesive backing as you move down. When you reach the bottom, cut the remaining seal material with scissors.
Installing the Vacation Lock:
Step 1:
Drill the Vacation Lock bolt hole. Position the Vacation Lock on the edge of your sliding glass door at the top or bottom with the Locking Bolt extended.
The end of the bolt should be facing your stationary door track. Using a pencil, trace around the circumference of the bolt on the stationary sliding glass door frame. Then Remove the Vacation Lock and mark the approximate center position of the bolt.Drill a 1/4-inch hole in your stationary sliding glass door frame for the bolt.
Step 2:
The Vacation Lock provides added security. It may be attached to you sliding glass door at the top or bottom. With the bolt extended and inserted into the drilled hole, position the Vacation Lock onto edge of your sliding glass door and, with a pencil, trace the slots of the Vacation Lock onto the edge of your sliding glass door.
Note: Before drilling, Retract the bolt and make sure there is clearance between the retracted bolt and your stationary door frame. Reposition the Vacation Lock if necessary, to make sure there is clearance but,also making sure that the bolt is still centered on the hole. Drill (2) holes in your sliding glass door using a #32 drill bit, one hole in the center of each of the slots you marked.
Step 3:
Fasten the Vacation Lock to your sliding glass door using (2) #8 X 5/8 round head sheet metal screws.
Videos
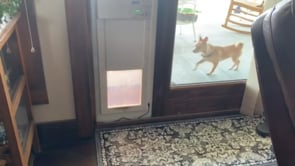
High Tech Power Pet Door Demo
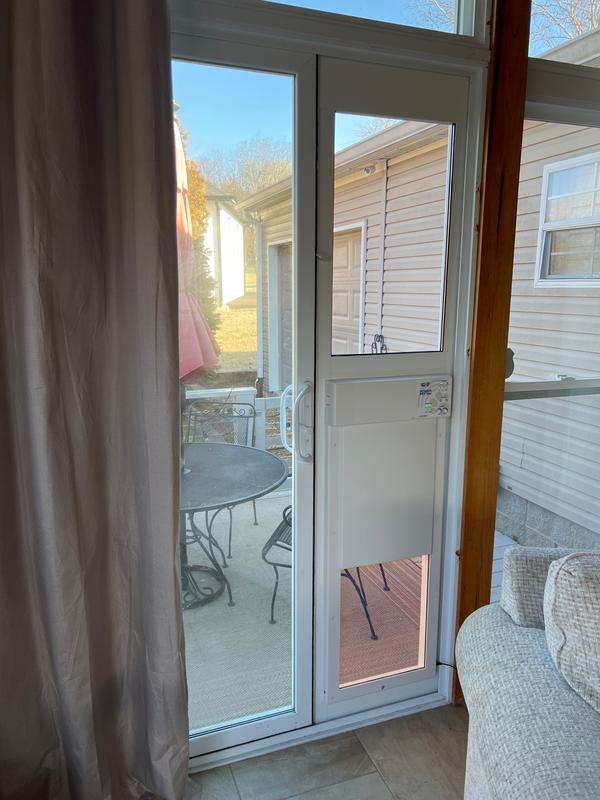
How to Measure Your Sliding Glass Door for a Pet Door
High Tech Energy Efficient Patio Pet Doors
Automatic Pet Doors
High Tech Automatic Pet Door Featured on HGTV
FAQ
Warranty
Warranty Type: Limited
Duration: One year from the original delivery date for all products except collar key batteries. Collar key batteries are not covered.
Coverage:
Repair or replacement for products that fail to operate within one year of the original delivery date.
Shipping of repaired or replaced products back to the customer via FedEx Ground or USPS priority mail is covered by High Tech Pet Products.
Exclusions:
Cleaning charges: Products returned dirty or with pet hair will incur a charge equal to 25% of the original purchase price.
Customer is responsible for the cost of shipping the defective product to High Tech Pet Products.
Expedited shipping requests for replacements are at the customer's expense.
All products, including pet doors, must be returned and examined before a replacement unit is sent.
Customer Reviews

Great product so far
We ordered and have installed. The install overall was pretty cut and dry. For the parts we weren’t sure of there was an installation video that was very good. We had two of the smaller screws break as we were putting them in so we only put one of each in instead of two. And our sliding door was a little wiggy so we put a bar behind it to keep it flush tight against the pet door. So far so good. Very solid apparatus. Looks nice. Easy to operate.
Love it
Love the door! Our dog has access to the back yard while we're at work with the added security that he's the only one in and out. Would like to have known the product we bought didn't have wifi. My fault for not reading throughly but paying $1k should include it.
Great for dog but let's the cat out
The works fantastic for my dog and she likes the freedom to go out whenever she wants and door serves it purpose to prevent dog from going in the when I am delayed at work. I have an older house so my patio door was not plumb which did make installing it challenging, however I got it to work. I hoped the door would keep my indoor cat inside, and I think in most circumstances that work, but not for cat as the dog will go outside and stand in front of door holding it open until the cat follows
Pet Door
Great without exception! l only wish the pet door portion was not tinted.
Satisfied
Easy to install. Collar devices are somewhat erratic. Overall, a great product for skittish dogs.