


Endura Flap Cat Door for Sliding Glass Doors
- Regular price
- $727.00
- Sale price
- $727.00
- Regular price
-
$727.00 - Unit price
- per


- Specifically designed for aluminum and vinyl sliding glass doors
- Vinyl panels fits 'U' shaped tracks a minimum of 1-1/2" thick for seamless installation
- Aluminum panels fits tracks at least 1" thick for most secure fit
- Available in multiple standard and custom adjustable track height ranges
- Weather-resistant flap stays flexible in -40 degree temperatures and withstands 50 mph winds
 Product Details
Product Details
The Endura Flap Sliding Glass Cat Door is designed specifically for aluminum or vinyl-framed sliding glass doors, offering an insulating and weather-resistant solution for your pet's needs. The panel fits comfortably in the track, while safety glass reduces offers a clear view outside.
With adjustable track height ranges, this pet door fits 'U' shaped tracks a minimum of 1" (aluminum) or 1-1/2" (vinyl) thick and provides seamless installation.
The weather-resistant flap remains flexible in temperatures as low as -40 degrees and withstands winds up to 50 mph, thanks to the magnets lining the flap, which keep it sealed during rough weather.
The frame is designed to match your existing sliding glass door for a consistent and sleek appearance. For best results, match the material of your sliding glass door with the panel. Mismatched materials may result in condensation.
The pet door can be easily installed and removed with the semi-permanent, spring-loaded design, making it ideal for rentals or vacation homes. This door is perfect for cats and dogs of all sizes, as it comes in small to extra-large flap sizes.
The Endura Flap Sliding Glass Cat Door includes a secure locking cover and c-clamp lock.
Features:
- Built for cats and dogs of all sizes, offering small to extra-large flaps
- Easy, spring-loaded installation allows for convenient removal without permanent alterations
- Ensures energy efficiency with magnets lining the flap to seal during rough weather
- Sturdy frame blends with existing sliding glass doors for a consistent aesthetic
- Secure locking cover and c-clamp lock included for enhanced safety
- Allows pets the freedom to access the outdoors independently
- Comes with a 90-day return policy and a 15-year warranty
- 5/16" can be trimmed off the top of pet door panel if you need it 5/16" shorter
Benefits:
- Frame applies seamlessly into the track for a highly insulating fit
- Panel can be removed at any time with the semi-permanent, spring-load design
- Steer clear from cutting holes or making any permanent changes to your door
- Comes in white to match the interior design of existing sliding glass door
- Sturdy locking cover allows you to secure the door when necessary
- Gives cats the freedom to access the outdoors without needing you to let them out
- Structurally sound design is built to last


Size Chart
- Aluminum Panel 6"w x 11"h
- Vinyl Panel 6"w x 11"h
Flap Dimensions:
6"w x 11"h
The entry way your dog goes through.Overall Panel Width
10 3/16"
How wide your panel is.


Step-Over Height
3” - 5”
The distance from the bottom of the panel to the bottom of your flap.Flap Dimensions:
6" w x 11" h
The entry way your dog goes through.Overall Panel Width
10 3/8"
How wide your panel is. Step-Over Height
4"
The distance from the bottom of the panel to the bottom of your flap.| Frame Material | Flap Dimension | Step Over | Overall Panel Width | Recommended Pet Height |
|---|---|---|---|---|
| Vinyl | 6" w x 11" h | 4" | 10 3/8" | 9" - 15" |
| Aluminum | 6" w x 11" h | 3" - 5" | 11 ¼" | 9" - 15" |
Your Track Height Adjustment Range is the measurement of your door height from the lowest point of your track to the highest point.
Review our Track Measuring Guide for more information.
Caution: If your measured track height is near the bottom of the adjustment range then you should review A Note of Caution.
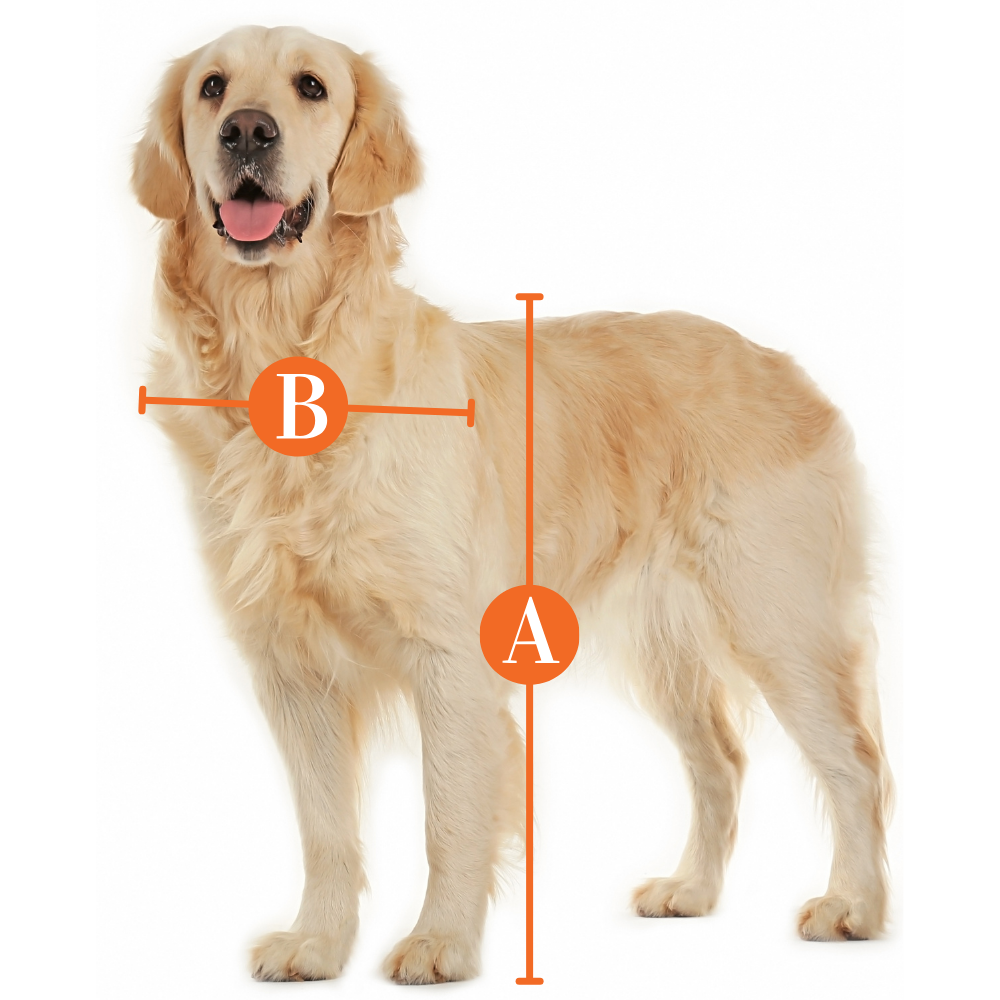
Find The Best Pet Door Size For My Pet

A
Pet Height: inches
B
Pet Width: inches
Installation Instructions
One-Piece Panel
 Printable Version
 Difficulty
 Steps
Steps
 Time Required
 Flags
Flags
Parts
- 1 Panel Pet Door
- 1 Foam Weather Strip
- 1 Center Post Weather Seal Draft Stopper
- 1 Sliding Door C-Clamp Lock
- 1 Flathead Screwdriver
Tools
- Flathead Screwdriver
Please read instructions & notes thoroughly before installation.
One-Piece Panel
Step 1 Adjust the Step Over (Optional)
- The top of the flap should be positioned to be at least 1” above the top of the pet's shoulder.
- If the factory setting is not suitable, please adjust it before proceeding. Otherwise, proceed to the Installation Instructions section.
Step 2 Adjust the Screws

- Lay the entire panel on a flat surface.
- Using the Phillips-header screwdriver, or selected power tool, remove the bottom side-screws and loosen the upper side screws.
Step 3 Adjust the Spacers

- Once the bottom screws have been removed and the upper side-screws loosened, the Pet Door Assembly and spacers can be removed by sliding the sections down and out of the panel.
Step 4 Replace the Spacers

- Replace the spacers and the Pet Door Assembly by sliding them back in a different order to achieve the desired height. You can move the spacer below and above the flap to raise or lower the flap height.
Step 5 Tighten the Screws
- When finished, replace the bottom side-screws and tighten the next upper-side screws.
Install the pet door panel
Step 6 Unlock Spring Mechanism

- Loosen the height adjustment locks at the top of the pet panel with the screwdriver. This allows the spring mechanism to move freely up and down.
Step 7 Test Fit the Panel in Your Track

- To insert the panel into the top track, push up against the spring mechanism and swing the bottom of the panel up and over the threshold.
- Seat the panel on top of the small guide rail in the track.
Step 8 Apply the Weatherstripping


- Once you're sure the panel fits, remove it from the frame and lay it on its side on the ground.
- For foam weatherstripping: Peel the backing off the foam weatherstripping. Press it along both edges of the panel, trimming as needed with scissors to ensure a snug fit.
- For rubber weatherstripping: Clean the edge of your sliding door or window with rubbing alcohol to help the weatherstripping stick properly. Starting at the top or bottom, peel and press the strip into place with the folded edge facing indoors—align angled cuts if you have two pieces. For best results, apply the seal to the sliding door or window, but it can go on the pet door panel if needed.
Step 9 Install the Draft Stopper

- The center post weather seal strip (draft stopper) should be installed on the inside of the home.
- Trim with scissors as needed. Clean the edge of your patio door with rubbing alcohol before installing to assure a good seal.
- Repeat step two to install the panel in your track.
Two-Piece Panel
Parts
- 1 Top Glass Panel Section
- 1 Bottom Flap Section
- 1 Foam Weather Strip
- 1 Center Post Weather Seal Draft Stopper
- 4 Flathead Screws
- 1 Flathead Screwdriver
- 1 Sliding Door C-Clamp Lock
Tools
- Flathead Screwdriver
Please read instructions & notes thoroughly before installation.
Two-Piece Panel
Step 1 Adjust Step Over Height (Optional)
- The top of the flap should be positioned to be at least 1” above the top of the pet's shoulder.
- If the factory setting is not suitable, please adjust it before proceeding. Otherwise, proceed to the Installation Instructions section.
Step 2 Rearrange the Pieces (Optional)

- Simply slide the pieces up and out from the bottom half of your panel to rearrange.
- Loosen a bottom screw if the pieces are too snug to move.
Step 3 Reconnect the Pieces (Optional)

- Replace the spacers and the Pet Door Assembly by sliding them back in a different order to achieve the desired height.
- You can move the spacer below or above the flap to raise or lower the flap height.
Step 4 Screw the Pieces Together

- It is critical that the bottom piece is placed at the base. This is the designated attachment point for the screws. You can now assemble the patio panel.
Step 5 Align the Connectors


- Remove the 2 flat head sectional connector screws from the exposed part of the connector on each side.
- Align the aluminum connectors extending from the bottom flap panel section with the top glass panel section.
- Press the aluminum connectors into the holes at the bottom of the top glass panel section.
Install the pet door panel
Step 6 Tap the Pieces Together

- Gently tap the bottom surface of the panel against the ground to completely insert the connectors.
- Protect hard surfaces to prevent scratching.
Step 7 Secure the Sections

- Fasten the two panels together using the four flathead screws.
- Use the included flathead screwdriver to tighten all four flathead screws so the two halves of the door are pulled together.
Step 8 Adjust Spring Mechanism
- Loosen the height adjustment locks at the top of the pet panel. This allows the spring mechanism to move freely up and down.
Step 9 Test Fit the Panel in Your Track
- To insert the panel into the top track, push up against the spring mechanism and swing the bottom of the panel up and over the threshold.
- Seat the panel on top of the small guide rail in the track.
Step 10 Apply the Weatherstripping
Step 8 Apply the Weatherstripping
- Once you're sure the panel fits, remove it from the frame and lay it on its side on the ground.
- For foam weatherstripping: Peel the backing off the foam weatherstripping. Press it along both edges of the panel, trimming as needed with scissors to ensure a snug fit.
- For rubber weatherstripping: Clean the edge of your sliding door or window with rubbing alcohol to help the weatherstripping stick properly. Starting at the top or bottom, peel and press the strip into place with the folded edge facing indoors—align angled cuts if you have two pieces. For best results, apply the seal to the sliding door or window, but it can go on the pet door panel if needed.
Step 11 Install the Draft Stopper
- The center post weather seal strip (draft stopper) should be installed on the inside of the home.
- Trim with scissors as needed. Clean the edge of your patio door with rubbing alcohol before installing to assure a good seal.
FAQ
What if my panel is slightly too tall?
You can trim up to 5/16" off the spring-loaded adjustment piece at the top. Remove the adjustment piece with a #2 Philips head screwdriver and use scissors to cut down the flanges. Be careful not to cut too low.
![]()
![]()
What if my panel is slightly too short?
We ofer height extensions that will add 1 1/2" to the top of the panel that you slide into the channel at the top. These are made from the same as the panel so the color will match exactly. If the extension makes the panel feel unstable, you can secure it with screws.
![]()
What if the panel is wobbling slightly back and forth?
If your track is wider than 1 1/2", you can use small wooden shims or extra weather-stripping to fill the gap inside the top and bottom tracks. By placing the material inside the tracks you won't be able to see it, but it will stabilize the panel.
Locking Your Door
Since you cannot lock your sliding glass door to the panel, we have provided you with a sliding door clamp lock to secure your home.
Installing the sliding door clamp:
This clamp as a screw that tightens by hand to prevent the sliding door from moving beyond the clamp's placement. For doors manufactured with the glass slider on the inside track, the lock can usually be installed on the door's raised track.
![]()
If you aren't able to use the lock that comes with the panel:
A great alternative to locking your sliding glass door is a Charley bar or dowel. Both block the slider from opening. When engaged, you cannot pull the sliding door away from the pet door panel.
![]()
FAQ
Warranty
Warranty Type: Lifetime
Duration: Lifetime of the product.
Coverage: Defects in materials and workmanship under standard regular use.
Exclusions:
Damage caused by misuse or not using the product as intended.
Improper installation.
Damage caused by chewing.