


Hale Pet Doors for Thick Walls With Extra Long Tunnel
- Regular price
- $439.99
- Sale price
- $439.99
- Regular price
-
- Unit price
- per


- Built for durability and versatility with sturdy aluminum framing and an extra-long tunnel that fits walls up to 16" thick.
- Four frame color options for seamless indoor and outdoor style. You can custom mix and match the interior and exterior frame colors as well.
- Single or double flap designs tailored for your climate, offering increased insulation and energy efficiency.
- Clear, lightweight vinyl flaps with adjustable magnets for easy access, even for pets of different sizes.
- Stain-resistant, mold-resistant brown carpet lines the tunnel for pet comfort and added insulation.
- Includes a matching, sturdy locking cover with a steel pin lock for enhanced security. Locking over is top-loading, but a side-loading option is available.
- Optional rain cap offers additional protection against water intrusion.
 Product Details
Product Details
The Hale Pet Doors for Thick Walls with Extra-Long Tunnel is a premium solution for homes with walls up to 16” thick. Designed with a sleek aluminum frame, this pet door offers both durability and style. Choose from four frame colors — White, Arizona Beige, Bronze, or Brushed Aluminum — to match your home’s interior and exterior decor.
Tailor the door to your pet and climate with single or double flap options. The double flap design provides superior insulation, reducing drafts and energy loss, making it ideal for extreme climates. The clear vinyl flaps are designed for easy visibility and lightweight enough for pets of all sizes, with adjustable magnets ensuring a snug seal against wind and weather.
The tunnel arrives pre-assembled and can be trimmed to fit walls from 2" to 16" thick. A stain-resistant, mold-resistant medium-pile brown carpet lines the interior tunnel, providing traction and comfort for your pet while adding insulation. The secure locking cover, color-matched to the frame and reinforced with a steel pin lock, offers peace of mind when the door is not in use.
For added protection from rain and moisture, consider the optional rain cap, which fits snugly over the outer frame to prevent water intrusion. Every Hale Pet Door includes detailed installation instructions, empowering DIY enthusiasts to complete the installation with confidence.
Built with high-quality materials and designed for lasting performance, the Hale Pet Doors for Thick Walls offers a premium pet access solution that combines style, security, and durability. Give your pet the freedom they deserve while maintaining the comfort and safety of your home.


Size Chart
- Small Medium 6 1/2"w x 9 1/2"h
- Medium 8 1/2"w x 12 1/2"h
- Tall Medium 8 1/2"w x 16"h
- Large 11"w x 16"h
- Tall Large 11"w x 19"h
- Tall Large Plus 11"w x 23 1/2"h
- Extra Tall Large 11"w x 27 1/2"h
- Extra Large 14"w x 19 1/2"h
- Extra Large Plus 14"w x 23 1/2"h
- Giant 15 1/2"w x 27 1/2"h
Flap Dimensions:
6 1/2"w x 9 1/2"h
The entry way your dog goes through.Outside Frame Dimensions
9 9/16"w x 12 9/16"h
The outer edge of the pet door.


Rough Cut Out:
8 1/2"w x 11 1/2"h
The size of the hole needed to fit your pet door into your door.Flap Dimensions:
8 1/2"w x 12 1/2"h
The entry way your dog goes through.Outside Frame Dimensions
11 9/16"w x 15 3/8"h
The outer edge of the pet door.


Rough Cut Out:
10 1/2"w x 14 1/2"h
The size of the hole needed to fit your pet door into your door.Flap Dimensions:
8 1/2"w x 16"h
The entry way your dog goes through.Outside Frame Dimensions
11 9/16"w x 19 1/16"h
The outer edge of the pet door. Rough Cut Out:
10 1/2"w x 18"h
The size of the hole needed to fit your pet door into your door.Flap Dimensions:
11"w x 16"h
The entry way your dog goes through.Outside Frame Dimensions
14 1/16"w x 19 1/16"h
The outer edge of the pet door.


Rough Cut Out:
13"w x 18"h
The size of the hole needed to fit your pet door into your door.Flap Dimensions:
11"w x 19 1/2"h
The entry way your dog goes through.Outside Frame Dimensions
14 1/16"w x 22 9/16"h
The outer edge of the pet door. Rough Cut Out:
13"w x 21 5/8"h
The size of the hole needed to fit your pet door into your door.Flap Dimensions:
11"w x 23 1/2"h
The entry way your dog goes through.Outside Frame Dimensions
14 1/16"w x 26 9/16"h
The outer edge of the pet door. Rough Cut Out:
13"w x 25 5/8"h
The size of the hole needed to fit your pet door into your door.Flap Dimensions:
11"w x 27 1/2"h
The entry way your dog goes through.Outside Frame Dimensions
14 1/16"w x 30 9/16"h
The outer edge of the pet door. Rough Cut Out:
13"w x 29 5/8"h
The size of the hole needed to fit your pet door into your door.Flap Dimensions:
14"w x 19 1/2"h
The entry way your dog goes through.Outside Frame Dimensions
17 1/16"w x 22 9/16"h
The outer edge of the pet door.


Rough Cut Out:
16"w x 21 5/8"h
The size of the hole needed to fit your pet door into your door.Flap Dimensions:
14"w x 19 1/2"h
The entry way your dog goes through.Outside Frame Dimensions
17 1/16"w x 22 9/16"h
The outer edge of the pet door. Rough Cut Out:
16"w x 21 5/8"h
The size of the hole needed to fit your pet door into your door.Flap Dimensions:
14"w x 23 1/2"h
The entry way your dog goes through.Outside Frame Dimensions
17 1/16"w x 26 9/16"h
The outer edge of the pet door. Rough Cut Out:
16"w x 25 5/8"h
The size of the hole needed to fit your pet door into your door.Flap Dimensions:
15 1/2"w x 27 1/2"h
The entry way your dog goes through.Outside Frame Dimensions
18 9/16"w x 30 9/16"h
The outer edge of the pet door. Rough Cut Out:
17 5/8"w x 29 5/8"h
The size of the hole needed to fit your pet door into your door.| Size | Flap Dimension | Rough Cut Out | Outside Frame Dimensions | Recommended Pet Height |
|---|---|---|---|---|
| Small Medium | 6 1⁄2" w x 9 1⁄2" h | 8 1⁄2" w x 11 1⁄2" h | 9 9⁄16" w x 12 9⁄16" h | 5" - 14" |
| Medium | 8 1⁄2" w x 12 1⁄2" h | 10 1⁄2" w x 14 1⁄2" h | 11 9⁄16" w x 15 3⁄8" h | 5" - 19" |
| Tall Medium | 8 1⁄2" w x 16" h | 10 1⁄2" w x 18" h | 11 9⁄16" w x 19 1⁄16" h | 5" - 23" |
| Large | 11" w x 16" h | 13" w x 18" h | 14 1⁄16" w x 19 1⁄16" h | 5" - 24" |
| Tall Large | 11" w x 19 1⁄2" h | 13" w x 21 5⁄8" h | 14 1⁄16" w x 22 9⁄16" h | 5"- 29" |
| Tall Large Plus | 11" w x 23 1⁄2" h | 13" w x 25 5⁄8" h | 14 1⁄16" w x 26 9⁄16" h | 5" - 34" |
| Extra Tall Large | 11" w x 27 1⁄2" h | 13" w x 29 5⁄8" h | 14 1⁄16" w x 30 9⁄16" h | 5" - 42" |
| Extra Large | 14" w x 19 1⁄2" h | 16" w x 21 5⁄8" h | 17 1⁄16" w x 22 9⁄16" h | 5" - 31" |
| Extra Large Plus | 14" w x 23 1⁄2" h | 16" w x 25 5⁄8" h | 17 1⁄16" w x 26 9⁄16" h | 5" - 36" |
| Giant | 15 1⁄2" w x 27 1⁄2" h | 17 5⁄8" w x 29 5⁄8" h | 18 9⁄16" w x 30 9⁄16" h | 5" - 44" |
Do not know which size to get? Here is a measurement guide to help you out.
After you make the basic pet door choices--flap size, single vs double flap and frame color--you will have an opportunity to make other product selections. These are custom and can be made through the following pages:
Locking Cover Load Direction (to accommodate obstructions)
Separate Inside Frame Color Choice (to match the inside of your home)
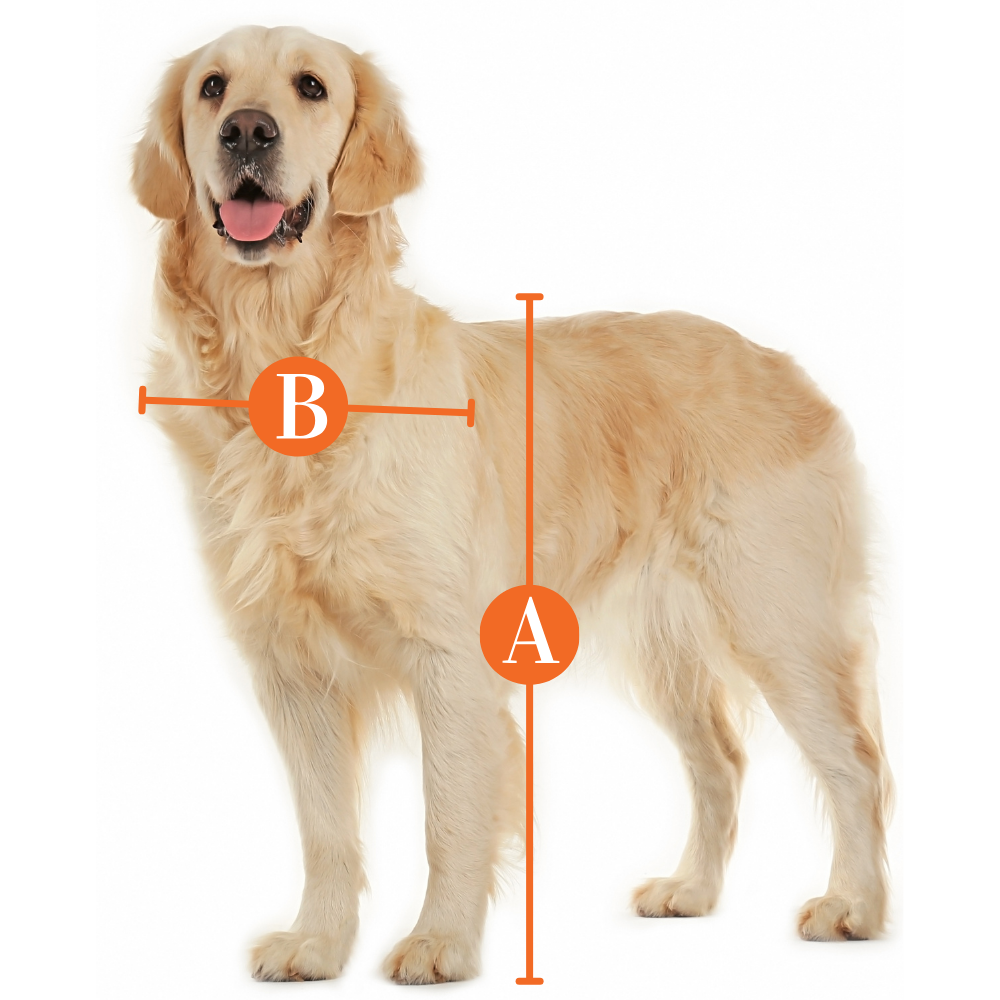
Find The Best Pet Door Size For My Pet

A
Pet Height: inches
B
Pet Width: inches
Installation Instructions
 Difficulty
Moderate
Difficulty
Moderate
 Steps
21
Steps
21
 Time Required
1 - 2 hours
Time Required
1 - 2 hours
 Sections
01
Sections
01
 Flags
09
Flags
09
Parts
- Warranty
- Hale Pet Door wall model (includes inner frame with attached tunnel and outer frame)
- Olefin nylon carpet
- King Starboard® or Lexan® Security Cover
- Flashing
- Raincap (optional; must be purchased separately)
- 5/8" #6 Phillips Head Screws
Tools
- Drop Cloths
- Caulking
- Circular saw with wood or masonry blade
- Caulk gun
- Drywall saw
- Tin snips
- Electric drill
- 24" Level
- Tape measure
- Blue masking tape
- Reciprocating saw
- Circular saw with wood or masonry blade
- 7/64" drill bit
Please read instructions & notes thoroughly before installation.
Step 1 Measure your Pet

- Before installation, be sure that you have the proper size pet door for your pet. If in doubt larger is better.
Step 2 Mark Door Location


- Find a suitable area for your wall model. Most wall models have a vertical lifting security cover (side loaded cover models are available as needed). Make sure the area has no obstructions to hinder the removal of this cover.
- For installation in a framed wall, try to place the pet door between studs; a stud finder makes finding stud locations easy. Mark the stud locations and if possible, center the pet door between the studs. Look at the preferred location from both the inside and outside of the wall for signs that wiring, cable or plumbing may be inside the wall. Keep in mind upstairs bathrooms may have plumbing in the lower level walls.
Step 3 Prep Area Around Wall

- Lay down drop cloths on both sides of the wall where you will be installing your pet door to make for easier cleanup after installation.
Step 4 Draw Rough Cut

- Draw a pattern on the inside wall according to your pet door size with a pencil. Wall openings are listed below according to pet door size. For special size pet doors the opening may be determined by measuring the tunnel. Make sure your opening is square and level.
| Pet Door Size | Rough Opening Width x Height |
|---|---|
| Small | 7 3/8" x 9 3/8" |
| Small Medium | 8 1/2" x 11 1/2" |
| Medium | 10 1/2" x 14 1/2" |
| Tall Medium | 10 1/2" x 18" |
| Large | 13" x 18" |
| Tall Large | 13" x 21 5/8" |
| Tall Large Plus | 13" x 25 5/8" |
| Extra Tall Large | 13" x 29 5/8" |
| Extra Large | 16" x 21 5/8" |
| Extra Large Plus | 16" x 25 5/8" |
| Giant | 17 5/8" x 29 5/8" |
Step 5 Check For Obstructions

- If nothing is seen or if the insulation is blocking your view, you may reach inside the wall and feel for obstructions that may not have been seen.
Step 6 Cut Interior Wall

- If the wall area is clear then you may proceed to cut the inside wall within the drawn pattern; a drywall saw is most generally used on the inside. Push the insulation up into the wall above and/or beside the rough opening.
Step 7 Cut Through to Exterior Wall


- Proceed with the wall cutout by drilling completely through the outer wall from the inside at each corner of the cutout pattern. A long drill bit may be required to do this. (A 12" long drill bit can usually be purchased for $4-$8 to help with this.) Be sure the drill is held straight so that the inner and outer holes are drilled in-line.
- On the outside wall, find the reference holes you drilled and draw your square on the wall. Again, measure carefully and make sure the exterior opening is both square and level and in line with the interior opening you previously cut.
Step 8 Drill Exterior Wall

- Drill out two corners diagonal from each other (top left and bottom right OR top right and bottom left). Depending on the construction of the wall you may want to use a 7/8" flat blade boring bit (for wood surfaces) or a 5/16" regular bit. If you use a 5/16" bit, drill three holes close together (shown below) then wiggle the bit until you have connected the three holes. This will allow you enough room to get a reciprocating saw blade into the holes.
Step 9 Cut Exterior Wall


- After the holes are connected, use a reciprocating saw to cut out the rough opening along the marked lines.
- After the opening is cut from the outside, remove the interior piece of sheetrock from the inside hole.
Step 10 Mark Tunnel Length

- Place the inside frame with attached tunnel through the wall cutout. From the outside, reach through the opening and hold the inside frame tight against the wall. Mark the tunnel with a pencil along the outside wall on all sides as shown.
- Hold pet door tightly against interior wall and mark with pencil from exterior to get correct tunnel depth.
Step 11 Trim Tunnel


- Remove the interior pet door frame and tunnel from the hole. Carefully cut the tunnel along the pencil mark with metal snips to make the tunnel the correct depth for your wall. Be cautious when cutting metal so you don't accidentally cut yourself on the removed piece. Discard the metal strip that you have cut off the tunnel.
- Use tin snips to cut the tunnel to the correct depth.
Step 12 Caulk Flashing


- The Flashing is a thin piece of aluminum with three flanges.
- Caulk the flashing with a latex caulking by applying two large beads on the bottom approximately ½" from the rear and another generous bead on the bottom and sides approximately 1" from the front. Apply a bead on the outside of both vertical flanges at the front. The bottom pre-drilled holes of the outer frame should sit directly above the bottom front bead of caulking when it is installed.
Step 13 Place the Flashing

- Place the flashing into the bottom of the wall opening. The flashing should have the two side flanges pointing upward and the outside flange downward and against the outside wall as shown
Step 14 Insert Frame

- Insert the inside frame and tunnel back into the opening. From the outside, pull the inside door frame tightly against the inside wall and push the flashing snug against the outside wall.
Step 15 Attach Raincap (Optional)


- The raincap attachment is a Hale exclusive design to aid in water containment and diversion. If your pet door is being installed in a protected area (i.e. indoors between two rooms, under a covered porch, etc.) or you did not purchase a rain cap, you may omit this step.
- The raincap is designed to keep water out of the pet door itself and is not required for installation. If you choose to use the raincap for your wall installation, attach it as shown in the graphic and picture to the left. It should simply hook onto the top of the outer frame.
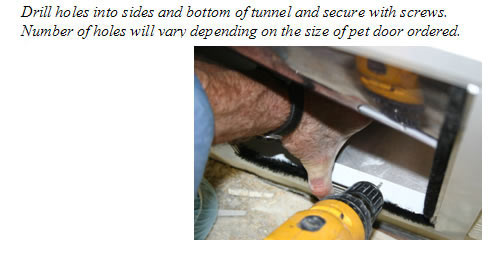
Step 16 Drill Holes Into Tunnel Sides and Flashing

- Sleeve the outside frame into the tunnel. With both pet door frames firmly pulled against their respective walls, drill two more holes through the tunnel and bottom flashing using a 7/64" drill bit and the existing pre-drilled holes (in the outer frame) as guides. Insert supplied screws into the drilled holes.
- Next, drill holes in the sides of the tunnel again using the pre-drill holes (in the outer frame) as a guide. The number of side screws varies with the size of pet door.
Step 17 Drill Holes Into Tunnel Bottom and Attach Flashing

- Drill two holes through the bottom of the tunnel evenly spaced and approximately 2" to 2 ½" back from the inside of the outer frame using a 7/64" drill bit. Insert the 5/8" #6 screws provided and tighten to attach the flashing to the tunnel.
Step 18 Seal With Caulking

- Use a caulking sealer between the outside frame and the outside wall at the top and both sides.
- You may also caulk around the whole perimeter of the inner frame, if desired, although this is not required. You may wish to outline the door with blue masking tape before you caulk to make a cleaner caulk line and to make cleanup easier. If you do decide to use the tape, allow the caulk to dry for a few minutes before you remove the tape.
Step 19 Add Inner Carpet


- Measure the width of the tunnel between the door frames and mark this measurement on the back of the carpet. Trim the included carpet to the correct width to cover the distance between the door frames. You may wish to dry fit the carpet into the tunnel to verify the width before using adhesive.
- To make it easier to install the carpet in the tunnel when the adhesive has been applied, use a caulk gun to apply the adhesive directly to the sides and bottom of the tunnel. Roll the two ends of the carpet inwards and set into the bottom of the tunnel. Carefully unroll one side of the carpet and press firmly to the side of the tunnel and the adhesive. Press the carpet tightly into the bottom corner of the tunnel. Push the carpet against the bottom of the tunnel and work it into the other bottom corner. Finally, unroll the second side of the carpet and press it firmly against the other side of the tunnel.
Step 20 Install Security Cover

- If you ordered a translucent gray Lexan® security cover for your pet door, peel the protective covering from the cover and set it aside for a couple of hours before installing it into the front frame. A drying period will prevent the inner flap from sticking to the newly uncovered Lexan®.
- If you ordered any color of the King Starboard® security cover, there will be no protective covering over it but you still may wish to let your door set without the security cover in place for a few hours to avoid any sticking. The cover will slide easily into place in the built in frame and can be easily locked and unlocked with the positive action pin bolt lock.
- Installing the standard top loading security cover. It can also be ordered side-loading.
Step 21 Clean-up Space

- If desired, you can place the wall pieces you removed in the pet door box to keep them in good condition for possible future use. They can usually be used to patch the wall if you ever need to remove the pet door.
- Remove the drop cloths and clean up the area. You may use any standard window cleaner to wipe down the flaps and remove any fingerprints or residue from the installation.
Videos
Hale Pet Door for Walls
FAQ
|
What is the main difference between this weather-proof and others? The Hale pet door offers a flexible, vinyl flap while other weather-proof models choose harder flap material. These vinyl flaps are thicker than standard, offering a greater resistance to extreme weather. |
|
Can I add additional magnets? Yes! You can attach and remove magnets. Removing magnets makes it easier for smaller pets to push through. With a screwdriver head, you can push the magnets off the flap. Adding magnets is a great way to increase your insulation value to combat outside weather as well. You can purchase additional magnets and strikes.This can add energy efficiency to your pet door. |
|
Why would I need a left or right locking load? Hale gives you options on how your locking cover opens based on the unique locations your door will be in. These options are included in case there is a lip above your frame that would stop your locking cover from sliding up. You can open your cover left or right depending on other obstructions on either side of the installation location. |
|
How do I adjust the tunnel sleeve to fit my wall length? The tunnel sleeve is made of aluminum, and will either be 10" or 16" in length. Once you measure the exact length of your wall, you will then have to cut the aluminum with metal snips according to size. You can discard the extra material left over. |
|
Where do you buy replacement flaps? Hale Replacement Flaps can be bought on our site. These flaps do not have logos on them, so it would be best to measure the flaps to make sure the correct size is ordered. The replacement flaps work for both wall and door installations, and wall and door models. |
|
What is the difference between single and double flap? Double flap mounts increase resistance to extreme weather. These are great options for blazing summer and snowy winters. While a Hale single flap can do the job of some double flap models, the additional vinyl can safeguard from wind and single digit temperatures. |
|
How do I install the carpet for this door? First, measure and trim the carpet to match your tunnel's width. You can use common construction glue to keep the carpet in place. Then, you can apply the adhesive to firmly lock the carpet against the tunnel. |
|
Why did the price just jump so high? The price for this model is dependent on how many flaps you order, and for what size. This wall mount uses some of the best pet door resources, so you are paying for quality. |
|
Can I attach a locking cover on both sides of the unit? If you want a locking cover on both sides, that would be a special order. Please let us know beforehand if you want to make that happen. Once you have the door in your home, an additional locking cover cannot be added the other side. The exterior locking cover can also only be manufactured to open from the left or right. |
|
Can my cats use a double flap? Cats should be able to push through a hale pet door double flap mount. It helps there will be a tunnel, since the two flaps will not be back to back so your cat will only go through one flap at a time. If it is difficult, you can also remove some magnets to lessen the resistance. |
|
Is this the same as the max seal? No they are very different in parts and dimensions. |
|
Where can I find Hale Pet Door Reviews? Find Hale Pet Doors for Walls Reviews here. You can click on the Review tab below the picture and read why this pet door for walls is rated 4.5 out of 5 stars! |
|
How high off the floor should my dog door be? Generally, every pet door should at least 3" off the floor to maintain your door or wall's integrity. The distance between the bottom edge of your pet door and the floor is called the step-over, and is an important aspect of determining how big of a pet door your dog requires. The step-over should be easy for your dog to "step-over," and never be more than a third of your dog's height. You can read more about step-overs in our measuring guide. |
|
How much does shipping cost? Shipping is calculated at checkout. |
Warranty
Warranty: Lifetime Frame Warranty / 10-Year Parts Warranty Including Flaps
Duration: Lifetime for frame and 10 years for parts including flaps.
Coverage:
Hale Pet Door products and components are guaranteed to be free from defects in materials and workmanship from the date of purchase.
Flaps are made from the best vinyl imported from France using Hale's custom chemical recipe.
Coverage percentages for parts (excluding frame) decreases by 20% every two years over a ten year period.
Returns within 30 days due to dissatisfaction results in a full refund, but if the product is damaged upon return, only 50% credit is provided.
Exclusions:
Warranty does not include shipping to Hale Pet Door or field service labor.
Glass Breakage: 50% replacement cost in the first year if the glass breaks. No warranty on glass after the first year. Excludes in-glass models' glass.
Only 50% credit is provided towards the cost of a replacement Hale Pet Door if damaged due to no fault of Hale Pet Door (e.g., miscutting, mismeasuring) within 30 days of purchase.
Customer Reviews

Size Chart
- Small Medium 6 1/2"w x 9 1/2"h
- Medium 8 1/2"w x 12 1/2"h
- Tall Medium 8 1/2"w x 16"h
- Large 11"w x 16"h
- Tall Large 11"w x 19"h
- Tall Large Plus 11"w x 23 1/2"h
- Extra Tall Large 11"w x 27 1/2"h
- Extra Large 14"w x 19 1/2"h
- Extra Large Plus 14"w x 23 1/2"h
- Giant 15 1/2"w x 27 1/2"h
Flap Dimensions:
6 1/2"w x 9 1/2"h
The entry way your dog goes through.Outside Frame Dimensions
9 9/16"w x 12 9/16"h
The outer edge of the pet door. Rough Cut Out:
8 1/2"w x 11 1/2"h
The size of the hole needed to fit your pet door into your door.Flap Dimensions:
8 1/2"w x 12 1/2"h
The entry way your dog goes through.Outside Frame Dimensions
11 9/16"w x 15 3/8"h
The outer edge of the pet door. Rough Cut Out:
10 1/2"w x 14 1/2"h
The size of the hole needed to fit your pet door into your door.Flap Dimensions:
8 1/2"w x 16"h
The entry way your dog goes through.Outside Frame Dimensions
11 9/16"w x 19 1/16"h
The outer edge of the pet door. Rough Cut Out:
10 1/2"w x 18"h
The size of the hole needed to fit your pet door into your door.Flap Dimensions:
11"w x 16"h
The entry way your dog goes through.Outside Frame Dimensions
14 1/16"w x 19 1/16"h
The outer edge of the pet door. Rough Cut Out:
13"w x 18"h
The size of the hole needed to fit your pet door into your door.Flap Dimensions:
11"w x 19 1/2"h
The entry way your dog goes through.Outside Frame Dimensions
14 1/16"w x 22 9/16"h
The outer edge of the pet door. Rough Cut Out:
13"w x 21 5/8"h
The size of the hole needed to fit your pet door into your door.Flap Dimensions:
11"w x 23 1/2"h
The entry way your dog goes through.Outside Frame Dimensions
14 1/16"w x 26 9/16"h
The outer edge of the pet door. Rough Cut Out:
13"w x 25 5/8"h
The size of the hole needed to fit your pet door into your door.Flap Dimensions:
11"w x 27 1/2"h
The entry way your dog goes through.Outside Frame Dimensions
14 1/16"w x 30 9/16"h
The outer edge of the pet door. Rough Cut Out:
13"w x 29 5/8"h
The size of the hole needed to fit your pet door into your door.Flap Dimensions:
14"w x 19 1/2"h
The entry way your dog goes through.Outside Frame Dimensions
17 1/16"w x 22 9/16"h
The outer edge of the pet door. Rough Cut Out:
16"w x 21 5/8"h
The size of the hole needed to fit your pet door into your door.Flap Dimensions:
14"w x 19 1/2"h
The entry way your dog goes through.Outside Frame Dimensions
17 1/16"w x 22 9/16"h
The outer edge of the pet door. Rough Cut Out:
16"w x 21 5/8"h
The size of the hole needed to fit your pet door into your door.Flap Dimensions:
14"w x 23 1/2"h
The entry way your dog goes through.Outside Frame Dimensions
17 1/16"w x 26 9/16"h
The outer edge of the pet door. Rough Cut Out:
16"w x 25 5/8"h
The size of the hole needed to fit your pet door into your door.Flap Dimensions:
15 1/2"w x 27 1/2"h
The entry way your dog goes through.Outside Frame Dimensions
18 9/16"w x 30 9/16"h
The outer edge of the pet door. Rough Cut Out:
17 5/8"w x 29 5/8"h
The size of the hole needed to fit your pet door into your door.| Size | Flap Dimension | Rough Cut Out | Outside Frame Dimensions | Recommended Pet Height |
|---|---|---|---|---|
| Small Medium | 6 1⁄2" w x 9 1⁄2" h | 8 1⁄2" w x 11 1⁄2" h | 9 9⁄16" w x 12 9⁄16" h | 5" - 14" |
| Medium | 8 1⁄2" w x 12 1⁄2" h | 10 1⁄2" w x 14 1⁄2" h | 11 9⁄16" w x 15 3⁄8" h | 5" - 19" |
| Tall Medium | 8 1⁄2" w x 16" h | 10 1⁄2" w x 18" h | 11 9⁄16" w x 19 1⁄16" h | 5" - 23" |
| Large | 11" w x 16" h | 13" w x 18" h | 14 1⁄16" w x 19 1⁄16" h | 5" - 24" |
| Tall Large | 11" w x 19 1⁄2" h | 13" w x 21 5⁄8" h | 14 1⁄16" w x 22 9⁄16" h | 5"- 29" |
| Tall Large Plus | 11" w x 23 1⁄2" h | 13" w x 25 5⁄8" h | 14 1⁄16" w x 26 9⁄16" h | 5" - 34" |
| Extra Tall Large | 11" w x 27 1⁄2" h | 13" w x 29 5⁄8" h | 14 1⁄16" w x 30 9⁄16" h | 5" - 42" |
| Extra Large | 14" w x 19 1⁄2" h | 16" w x 21 5⁄8" h | 17 1⁄16" w x 22 9⁄16" h | 5" - 31" |
| Extra Large Plus | 14" w x 23 1⁄2" h | 16" w x 25 5⁄8" h | 17 1⁄16" w x 26 9⁄16" h | 5" - 36" |
| Giant | 15 1⁄2" w x 27 1⁄2" h | 17 5⁄8" w x 29 5⁄8" h | 18 9⁄16" w x 30 9⁄16" h | 5" - 44" |
Do not know which size to get? Here is a measurement guide to help you out.
After you make the basic pet door choices--flap size, single vs double flap and frame color--you will have an opportunity to make other product selections. These are custom and can be made through the following pages:
Locking Cover Load Direction (to accommodate obstructions)
Separate Inside Frame Color Choice (to match the inside of your home)
Find The Best Pet Door Size For My Pet
A
Pet Height: inches
B
Pet Width: inches
Installation Instructions
Difficulty
Moderate
Steps
21
Time Required
1 - 2 hours
Sections
01
Flags
09
Parts
- Warranty
- Hale Pet Door wall model (includes inner frame with attached tunnel and outer frame)
- Olefin nylon carpet
- King Starboard® or Lexan® Security Cover
- Flashing
- Raincap (optional; must be purchased separately)
- 5/8" #6 Phillips Head Screws
Tools
- Drop Cloths
- Caulking
- Circular saw with wood or masonry blade
- Caulk gun
- Drywall saw
- Tin snips
- Electric drill
- 24" Level
- Tape measure
- Blue masking tape
- Reciprocating saw
- Circular saw with wood or masonry blade
- 7/64" drill bit
Please read instructions & notes thoroughly before installation.
Step 1 Measure your Pet
- Before installation, be sure that you have the proper size pet door for your pet. If in doubt larger is better.
Step 2 Mark Door Location
- Find a suitable area for your wall model. Most wall models have a vertical lifting security cover (side loaded cover models are available as needed). Make sure the area has no obstructions to hinder the removal of this cover.
- For installation in a framed wall, try to place the pet door between studs; a stud finder makes finding stud locations easy. Mark the stud locations and if possible, center the pet door between the studs. Look at the preferred location from both the inside and outside of the wall for signs that wiring, cable or plumbing may be inside the wall. Keep in mind upstairs bathrooms may have plumbing in the lower level walls.
Step 3 Prep Area Around Wall
- Lay down drop cloths on both sides of the wall where you will be installing your pet door to make for easier cleanup after installation.
Step 4 Draw Rough Cut
- Draw a pattern on the inside wall according to your pet door size with a pencil. Wall openings are listed below according to pet door size. For special size pet doors the opening may be determined by measuring the tunnel. Make sure your opening is square and level.
| Pet Door Size | Rough Opening Width x Height |
|---|---|
| Small | 7 3/8" x 9 3/8" |
| Small Medium | 8 1/2" x 11 1/2" |
| Medium | 10 1/2" x 14 1/2" |
| Tall Medium | 10 1/2" x 18" |
| Large | 13" x 18" |
| Tall Large | 13" x 21 5/8" |
| Tall Large Plus | 13" x 25 5/8" |
| Extra Tall Large | 13" x 29 5/8" |
| Extra Large | 16" x 21 5/8" |
| Extra Large Plus | 16" x 25 5/8" |
| Giant | 17 5/8" x 29 5/8" |
Step 5 Check For Obstructions
- If nothing is seen or if the insulation is blocking your view, you may reach inside the wall and feel for obstructions that may not have been seen.
Step 6 Cut Interior Wall
- If the wall area is clear then you may proceed to cut the inside wall within the drawn pattern; a drywall saw is most generally used on the inside. Push the insulation up into the wall above and/or beside the rough opening.
Step 7 Cut Through to Exterior Wall
- Proceed with the wall cutout by drilling completely through the outer wall from the inside at each corner of the cutout pattern. A long drill bit may be required to do this. (A 12" long drill bit can usually be purchased for $4-$8 to help with this.) Be sure the drill is held straight so that the inner and outer holes are drilled in-line.
- On the outside wall, find the reference holes you drilled and draw your square on the wall. Again, measure carefully and make sure the exterior opening is both square and level and in line with the interior opening you previously cut.
Step 8 Drill Exterior Wall
- Drill out two corners diagonal from each other (top left and bottom right OR top right and bottom left). Depending on the construction of the wall you may want to use a 7/8" flat blade boring bit (for wood surfaces) or a 5/16" regular bit. If you use a 5/16" bit, drill three holes close together (shown below) then wiggle the bit until you have connected the three holes. This will allow you enough room to get a reciprocating saw blade into the holes.
Step 9 Cut Exterior Wall
- After the holes are connected, use a reciprocating saw to cut out the rough opening along the marked lines.
- After the opening is cut from the outside, remove the interior piece of sheetrock from the inside hole.
Step 10 Mark Tunnel Length
- Place the inside frame with attached tunnel through the wall cutout. From the outside, reach through the opening and hold the inside frame tight against the wall. Mark the tunnel with a pencil along the outside wall on all sides as shown.
- Hold pet door tightly against interior wall and mark with pencil from exterior to get correct tunnel depth.
Step 11 Trim Tunnel
- Remove the interior pet door frame and tunnel from the hole. Carefully cut the tunnel along the pencil mark with metal snips to make the tunnel the correct depth for your wall. Be cautious when cutting metal so you don't accidentally cut yourself on the removed piece. Discard the metal strip that you have cut off the tunnel.
- Use tin snips to cut the tunnel to the correct depth.
Step 12 Caulk Flashing
- The Flashing is a thin piece of aluminum with three flanges.
- Caulk the flashing with a latex caulking by applying two large beads on the bottom approximately ½" from the rear and another generous bead on the bottom and sides approximately 1" from the front. Apply a bead on the outside of both vertical flanges at the front. The bottom pre-drilled holes of the outer frame should sit directly above the bottom front bead of caulking when it is installed.
Step 13 Place the Flashing
- Place the flashing into the bottom of the wall opening. The flashing should have the two side flanges pointing upward and the outside flange downward and against the outside wall as shown
Step 14 Insert Frame
- Insert the inside frame and tunnel back into the opening. From the outside, pull the inside door frame tightly against the inside wall and push the flashing snug against the outside wall.
Step 15 Attach Raincap (Optional)
- The raincap attachment is a Hale exclusive design to aid in water containment and diversion. If your pet door is being installed in a protected area (i.e. indoors between two rooms, under a covered porch, etc.) or you did not purchase a rain cap, you may omit this step.
- The raincap is designed to keep water out of the pet door itself and is not required for installation. If you choose to use the raincap for your wall installation, attach it as shown in the graphic and picture to the left. It should simply hook onto the top of the outer frame.
Step 16 Drill Holes Into Tunnel Sides and Flashing
- Sleeve the outside frame into the tunnel. With both pet door frames firmly pulled against their respective walls, drill two more holes through the tunnel and bottom flashing using a 7/64" drill bit and the existing pre-drilled holes (in the outer frame) as guides. Insert supplied screws into the drilled holes.
- Next, drill holes in the sides of the tunnel again using the pre-drill holes (in the outer frame) as a guide. The number of side screws varies with the size of pet door.
Step 17 Drill Holes Into Tunnel Bottom and Attach Flashing
- Drill two holes through the bottom of the tunnel evenly spaced and approximately 2" to 2 ½" back from the inside of the outer frame using a 7/64" drill bit. Insert the 5/8" #6 screws provided and tighten to attach the flashing to the tunnel.
Step 18 Seal With Caulking
- Use a caulking sealer between the outside frame and the outside wall at the top and both sides.
- You may also caulk around the whole perimeter of the inner frame, if desired, although this is not required. You may wish to outline the door with blue masking tape before you caulk to make a cleaner caulk line and to make cleanup easier. If you do decide to use the tape, allow the caulk to dry for a few minutes before you remove the tape.
Step 19 Add Inner Carpet
- Measure the width of the tunnel between the door frames and mark this measurement on the back of the carpet. Trim the included carpet to the correct width to cover the distance between the door frames. You may wish to dry fit the carpet into the tunnel to verify the width before using adhesive.
- To make it easier to install the carpet in the tunnel when the adhesive has been applied, use a caulk gun to apply the adhesive directly to the sides and bottom of the tunnel. Roll the two ends of the carpet inwards and set into the bottom of the tunnel. Carefully unroll one side of the carpet and press firmly to the side of the tunnel and the adhesive. Press the carpet tightly into the bottom corner of the tunnel. Push the carpet against the bottom of the tunnel and work it into the other bottom corner. Finally, unroll the second side of the carpet and press it firmly against the other side of the tunnel.
Step 20 Install Security Cover
- If you ordered a translucent gray Lexan® security cover for your pet door, peel the protective covering from the cover and set it aside for a couple of hours before installing it into the front frame. A drying period will prevent the inner flap from sticking to the newly uncovered Lexan®.
- If you ordered any color of the King Starboard® security cover, there will be no protective covering over it but you still may wish to let your door set without the security cover in place for a few hours to avoid any sticking. The cover will slide easily into place in the built in frame and can be easily locked and unlocked with the positive action pin bolt lock.
- Installing the standard top loading security cover. It can also be ordered side-loading.
Step 21 Clean-up Space
- If desired, you can place the wall pieces you removed in the pet door box to keep them in good condition for possible future use. They can usually be used to patch the wall if you ever need to remove the pet door.
- Remove the drop cloths and clean up the area. You may use any standard window cleaner to wipe down the flaps and remove any fingerprints or residue from the installation.
Videos
Hale Pet Door for Walls
FAQ
|
What is the main difference between this weather-proof and others? The Hale pet door offers a flexible, vinyl flap while other weather-proof models choose harder flap material. These vinyl flaps are thicker than standard, offering a greater resistance to extreme weather. |
|
Can I add additional magnets? Yes! You can attach and remove magnets. Removing magnets makes it easier for smaller pets to push through. With a screwdriver head, you can push the magnets off the flap. Adding magnets is a great way to increase your insulation value to combat outside weather as well. You can purchase additional magnets and strikes.This can add energy efficiency to your pet door. |
|
Why would I need a left or right locking load? Hale gives you options on how your locking cover opens based on the unique locations your door will be in. These options are included in case there is a lip above your frame that would stop your locking cover from sliding up. You can open your cover left or right depending on other obstructions on either side of the installation location. |
|
How do I adjust the tunnel sleeve to fit my wall length? The tunnel sleeve is made of aluminum, and will either be 10" or 16" in length. Once you measure the exact length of your wall, you will then have to cut the aluminum with metal snips according to size. You can discard the extra material left over. |
|
Where do you buy replacement flaps? Hale Replacement Flaps can be bought on our site. These flaps do not have logos on them, so it would be best to measure the flaps to make sure the correct size is ordered. The replacement flaps work for both wall and door installations, and wall and door models. |
|
What is the difference between single and double flap? Double flap mounts increase resistance to extreme weather. These are great options for blazing summer and snowy winters. While a Hale single flap can do the job of some double flap models, the additional vinyl can safeguard from wind and single digit temperatures. |
|
How do I install the carpet for this door? First, measure and trim the carpet to match your tunnel's width. You can use common construction glue to keep the carpet in place. Then, you can apply the adhesive to firmly lock the carpet against the tunnel. |
|
Why did the price just jump so high? The price for this model is dependent on how many flaps you order, and for what size. This wall mount uses some of the best pet door resources, so you are paying for quality. |
|
Can I attach a locking cover on both sides of the unit? If you want a locking cover on both sides, that would be a special order. Please let us know beforehand if you want to make that happen. Once you have the door in your home, an additional locking cover cannot be added the other side. The exterior locking cover can also only be manufactured to open from the left or right. |
|
Can my cats use a double flap? Cats should be able to push through a hale pet door double flap mount. It helps there will be a tunnel, since the two flaps will not be back to back so your cat will only go through one flap at a time. If it is difficult, you can also remove some magnets to lessen the resistance. |
|
Is this the same as the max seal? No they are very different in parts and dimensions. |
|
Where can I find Hale Pet Door Reviews? Find Hale Pet Doors for Walls Reviews here. You can click on the Review tab below the picture and read why this pet door for walls is rated 4.5 out of 5 stars! |
|
How high off the floor should my dog door be? Generally, every pet door should at least 3" off the floor to maintain your door or wall's integrity. The distance between the bottom edge of your pet door and the floor is called the step-over, and is an important aspect of determining how big of a pet door your dog requires. The step-over should be easy for your dog to "step-over," and never be more than a third of your dog's height. You can read more about step-overs in our measuring guide. |
|
How much does shipping cost? Shipping is calculated at checkout. |
Warranty
Warranty: Lifetime Frame Warranty / 10-Year Parts Warranty Including Flaps
Duration: Lifetime for frame and 10 years for parts including flaps.
Coverage:
Hale Pet Door products and components are guaranteed to be free from defects in materials and workmanship from the date of purchase.
Flaps are made from the best vinyl imported from France using Hale's custom chemical recipe.
Coverage percentages for parts (excluding frame) decreases by 20% every two years over a ten year period.
Returns within 30 days due to dissatisfaction results in a full refund, but if the product is damaged upon return, only 50% credit is provided.
Exclusions:
Warranty does not include shipping to Hale Pet Door or field service labor.
Glass Breakage: 50% replacement cost in the first year if the glass breaks. No warranty on glass after the first year. Excludes in-glass models' glass.
Only 50% credit is provided towards the cost of a replacement Hale Pet Door if damaged due to no fault of Hale Pet Door (e.g., miscutting, mismeasuring) within 30 days of purchase.