


Endura Flap Thermo Panel 3e for Cats


- Most insulating cat door for sliding glass doors with durable aluminum frame (11 1/4" wide) and safety glass
- Available in white, brushed aluminum, or bronze (black) to complement various home decors
- Adjustable magnet strength for easy training and a secure, weather-tight seal
- Heavy-duty extruded aluminum panel available in three size ranges for perfect fit
- Designed, engineered, and manufactured in the USA for quality assurance
- Prefer dual pane glass? Explore our Dual Pane Thermo Panel
 Product Details
Product Details
The Endura Flap Thermo Panel 3e for Cats provides an energy-efficient and secure solution for granting your feline friends the freedom and independence to come and go as they please. This innovative cat door is designed for sliding glass doors and features a heavy-duty aluminum frame (11.25 inches wide) made with optimal insulation and reduced energy costs in mind.
Available in white, brushed aluminum, or bronze (black) finishes, the Thermo Panel 3e complements various home decors. The environmentally friendly, polyolefin-polymer flap resists extreme temperatures, remaining flexible in -40 degrees Fahrenheit and withstanding winds up to 50 mph. This ensures your home remains comfortable and energy-efficient year-round.
Installation is quick and easy, thanks to the spring-loaded design. There's no need for permanent alterations, making it perfect for rentals, vacation homes, or those who want to occasionally remove the panel for full use of the sliding glass door. The Thermo Panel 3e comes in three size ranges, with custom heights available to accommodate varying sliding glass door sizes.
The 6" x 11" flap size and adjustable step-over height cater to cats of all breeds and sizes, while the adjustable magnet strength ensures a secure, weather-tight seal and promotes easy training. Foam weatherstripping and a center post weather seal draft stopper are included for improved insulation and energy efficiency.
Features:
- Heavy-duty, extruded aluminum panel available in three sizes (74 3/4" - 77 3/4", 77 1/4" - 80 1/4" or 93 1/4 " - 96 1/4") to accommodate varying sliding glass door sizes.
- Environmentally friendly, polyolefin-polymer flap resists extreme temperatures and winds up to 50 mph
- Spring-loaded design allows for quick and easy installation without permanent alterations to your home
- 6" x 11" flap size and adjustable step-over height accommodate cats of all breeds and sizes
- Includes foam weatherstripping and center post weather seal draft stopper for improved insulation and energy efficiency
- C-Clamp Lock included to lock the slider. Charley Bar can be purchased separately if you prefer.
Benefits:
- Removable pet door insert is perfect for rentals, vacation homes, or people who want to occasionally take out the panel for full use of the sliding glass door.
- Avoid making permanent alterations to your home.
- Flexible flap prevents pinching or snagging when cats use the door.
- Structurally sound design prevents heating/cooling loss and ensures longevity.
- Cats can freely exert their independence.
- Designed, engineered, and manufactured in the USA.


Size Chart
- Endura Flap Thermo Panel 3e for Cats6”w x 11”h
Flap Dimensions:
6"w x 11"h
The entry way your dog goes through.Overall Panel Width
11 1/4"
How wide your panel is.


Step-Over Height
3” - 5”
The distance from the bottom of the panel to the bottom of your flap.| Flap Size | Flap Dimension | Step Over Range | Overall Panel Width | Recommended Pet Height |
|---|---|---|---|---|
| Small | 6" w x 11" h | 3"-5" | 11 1/4" | 9" - 15" |
Track Height Adjustment Range is the measurement of your door height from the lowest point of your track to the highest point. Review our Track Measuring Guide. The Thermo Panel 3e Cat Door Panel comes in three adjustable ranges:
- Short - 74 3/4" - 77 3/4"
- Regular - 77 1/4" - 80 1/4"
- Tall - 93 1/4" - 96 1/4" (additional cost)
If your measured track height does not fall within one of the ranges above, we can make a custom height. Choose the range that your track height falls into and when ordered you will be asked to give the exact height of your slider track inside very top to very bottom. In each case you will have 3" of height adjustment with the height you specify approximately in the middle of that range. The ranges are:
- under 74 3/4"
- 80 1/4" - 93 1/4"
- over 96 1/4"
If your measured track height is near the bottom of the adjustment range then you should review A Note of Caution.
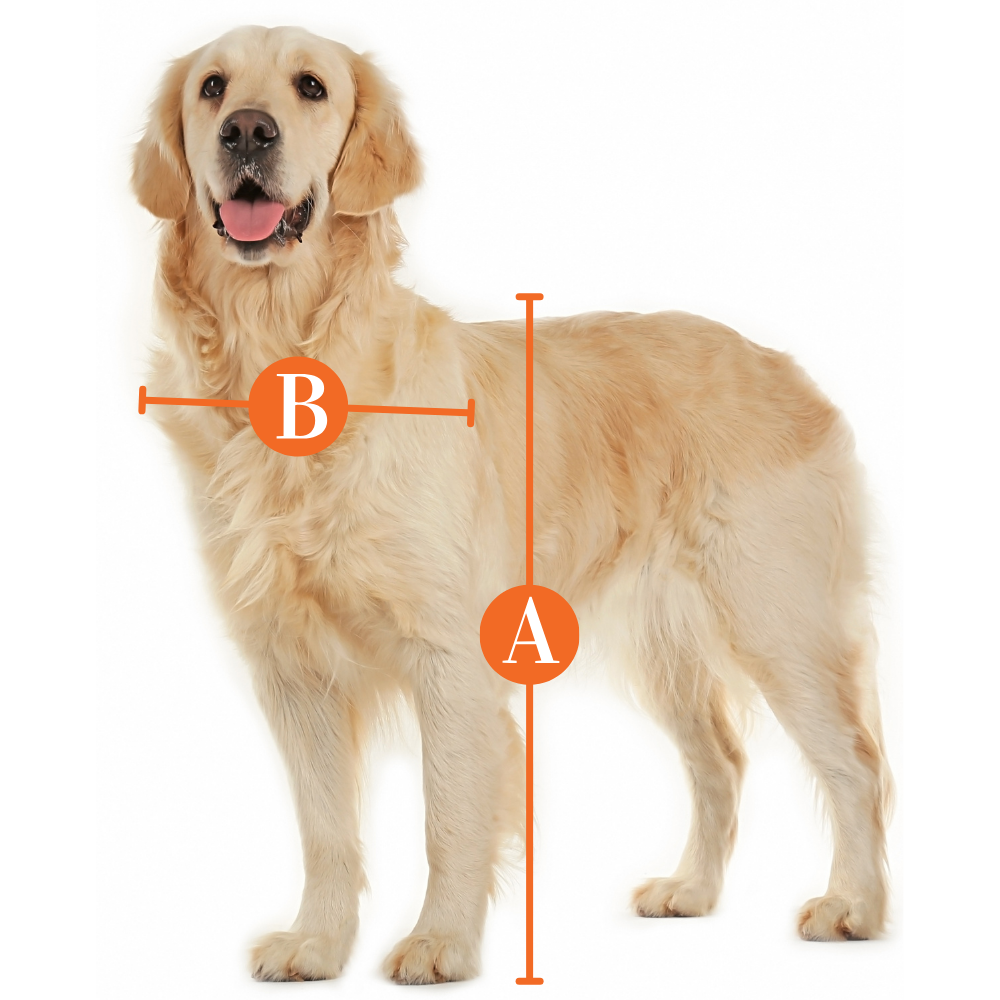
Find The Best Pet Door Size For My Pet

A
Pet Height: inches
B
Pet Width: inches
Installation Instructions
 Difficulty
Easy
Difficulty
Easy
 Steps
06
Steps
06
 Time Required
0.5 hours
Time Required
0.5 hours
 Sections
02
Sections
02
 Flags
02
Flags
02
Parts
- Panel Pet Door
- Foam Weather Strip
- Center Post Weather Seal Draft Stopper
- Sliding Door C-Clamp Lock
- Screwdriver
Tools
- Flathead Screwdriver
Please read instructions & notes thoroughly before installation.
One-Piece Panel
Step 1 Adjust the Step Over (Optional)

- The top of the flap should be positioned to be at least 1” above the top of the pet’s shoulder.
- If the factory setting is not suitable, please adjust it before proceeding. If the current setting is suitable, proceed to the “Installation Instructions” section.
Step 2 Adjust the Screws

- Lay the entire panel on a flat surface.
- Using a #2 flat head screwdriver, remove the bottom side-screws and loosen the upper side-screws. Screws were tightly installed to hold the panel together during shipping; a power tool* is recommended.
Step 3 Adjust the Spacers

- Once the bottom screws have been removed and the upper side-screws loosened, the Pet Door Assembly and spacers can be removed by sliding the sections down and out of the panel.
Step 4 Replace the Spacers

- Replace the spacers and the Pet Door Assembly by sliding them back in a different order to achieve the desired height. You can move the spacer below and above the flap to raise or lower the flap height.
Step 5 Tighten the Screws
- When finished, replace the bottom side-screws and tighten the next upper-side screws.
Step 6 Unlock Spring Mechanism

- Loosen the height adjustment locks at the top of the pet panel with the screwdriver. This allows the spring mechanism to move freely up and down.
Step 7 Test Fit the Panel in Your Track

- To insert the panel into the top track, push up against the spring mechanism and swing the bottom of the panel up and over the threshold.
- Seat the panel on top of the small guide rail in the track.
Step 8 Apply the Weatherstripping

- Once you’re sure the panel fits, remove it from the frame and lay it on its side on the ground.
- Apply the foam weather-stripping by peeling back the paper and exposing the adhesive.
- Unroll it along the edge of the panel, pressing to ensure it adheres. Install on both sides, trim it fit with scissors.
Step 9 Install the Draft Stopper

- The center post weather seal strip (draft stopper) should be installed on the inside of the home.
- Trim with scissors as needed. Clean the edge of your patio door with rubbing alcohol before installing to assure a good seal.
- Repeat step two to install the panel in your track.
Difficulty
Easy
Steps
06
Time Required
0.5 hours
 Sections
03
Flags
02
Sections
03
Flags
02
Parts
- Top Glass Panel Section
- Bottom Flap Section
- Foam Weather Strip
- Center Post Weather Seal Draft Stopper
- 4 Flathead Screws
- Flathead Screwdriver
- Screwdriver for Adjustment Locks
- Sliding Door C-Clamp Lock
Tools
- Flathead Screwdriver
Please read instructions & notes thoroughly before installation.
Two-Piece Panel
Step 1 Adjust Step Over Height (Optional)

- The top of the flap should be positioned to be at least 1” above the top of the pet’s shoulder.
- If the factory setting is not suitable, please adjust it before proceeding. If the current setting is suitable, proceed to the “Installation Instructions” section.
Step 2 Rearrange the Pieces (Optional)

- Simply slide the pieces up and out from the bottom half of your panel to rearrange.
- Loosen a bottom screw if the pieces are too snug to move.
Step 3 Reconnect the Pieces (Optional)
- Replace the spacers and the Pet Door Assembly by sliding them back in a different order to achieve the desired height.
- You can move the spacer below or above the flap to raise or lower the flap height.
Step 4 Screw the Pieces Together

- The order of the pieces is important! The piece on the bottom needs to always be at the bottom, as that is where the screws attach. You can now assemble the patio panel!
Step 5 Align the Connectors


- Remove the 2 flat head sectional connector screws from the exposed part of the connector on each side.
- Align the aluminum connectors extending from the bottom flap panel section with the top glass panel section.
- Press the aluminum connectors into the holes at the bottom of the top glass panel section.
- Ensure locking cover & height adjustment locks are on the same side!
Step 6 Tap the Pieces Together

- Gently tap the bottom surface of the panel against the ground to completely insert the connectors.
- Protect hard surfaces to prevent scratching.
- The components of the panel are designed to slide together very tightly.
Step 7 Secure the Sections

- Fasten the two panels together using the four flathead screws.
- Use the included flathead screwdriver to tighten all four flathead screws so the two halves of the door are pulled together.
Step 8 Adjust Spring Mechanism
- Loosen the height adjustment locks at the top of the pet panel. This allows the spring mechanism to move freely up and down.
Step 9 Test Fit the Panel in Your Track
- To insert the panel into the top track, push up against the spring mechanism and swing the bottom of the panel up and over the threshold.
- Seat the panel on top of the small guide rail in the track.
Step 10 Apply the Weatherstripping
- Once you’re sure the panel fits, remove it from the frame and lay it on its side on the ground.
- Apply the foam weather-stripping by peeling back the paper and exposing the adhesive.
- Unroll it along the edge of the panel, pressing to ensure it adheres. Install on both sides, trim it fit with scissors.
- Repeat step two to install the panel in your track.
Step 11 Install the Draft Stopper
- The center post weather seal strip (draft stopper) should be installed on the inside of the home.
- Trim with scissors as needed. Clean the edge of your patio door with rubbing alcohol before installing to assure a good seal.
Adjusting Stepover Height
Lock Details

Since you cannot lock your sliding door to your panel pet door, we have provided you with alternative locking methods to secure your home:
Installing the sliding door clamp: This clamp has a screw that tightens by hand to prevent the sliding door from moving beyond the clamp’s placement. For doors manufactured with the glass slider on the inside track, the lock can usually be installed on the door’s raised track.
If you aren’t able to use the lock that comes with the panel: A great alternative to locking your sliding glass door is a Charley bar or dowel in the track. Both work off the same concept – they block the slider from opening. When engaged you cannot pull the sliding door away from the pet door panel.

Other Installation Options
Semi-Permanent Installation:
You might choose to secure the panel in your track with screws. This can be done by drilling screws at an angle in the top and bottom tracks. We recommend doing this from the outside to minimize damage to the sliding glass door frame. One-way screws will prevent tampering or removal of the panel from the outside.

Stationary Panel:
Some stationary sliding door panels can be unfastened and moved over to one side so that you can install the pet door panel between the jamb and stationary panel.
Avoid damaging your sliding glass door by checking that your door can move and that you can reinstall it properly before trying to uninstall the unit.
You will still lose space in your slider to move through, however, you will be able to use your existing sliding door lock to secure your home. Installing your pet door this way is also great in that you already have an alarm system in place.
If your sliding glass door slides on the outside track, using an alternative lock might not be possible, so this allows you to still lock your door.
NOTE: You can do the stationary panel install with the regular spring actuator method – no need to screw it in.
Videos
Removing Magnets for Training with the Endura Flap
How to Measure a Sliding Glass Door for a Pet Door
FAQ
|
Can an intruder remove the Endura Flap cat door for slider from the outside? No, the thumbscrews are on the inside of the dog door panel, so once installed, the Endura Flap Panel can't be lifted out. |
|
Does the Endura Flap cat sliding door come with locking covers for security? Yes, there is a slide-in closing cover that you insert on the interior side of the panel. This closing panel will keep your pets inside and keep unwanted critters out. |
|
Do the Endura Flap panels require tools for installation? Endura Flap sliding glass doors for cats require a flathead screwdriver for the height adjustment locks. |
|
Under which height for a Endura Flap sliding cat door would it need to be custom? 74 3/4" is the smallest the off the shelf pet patio door would compress down to. |
|
At which height over 74 3/4" would a the Thermo Panel Cat door insert need to be custom? Anything from 80 1/4" - 93 1/4", and over 96 1/4" - 100" |
|
What is the absolute minimum and absolute maximum custom heights for Endura Flap Kitty Panels? The minimum still using the glass would be 35", and the maximum would be 100". |
|
What if I am outside those minimums and maximums for customs? Then you can contact us in customer service and we can see what we can do to make you a custom door outside our normal ranges. In some cases extra spacers can be used to extend the panel, or they can be used in place of the glass to get under that 35" minimum. |
|
What happens if I got a panel that was a tiny bit too tall? The top had two 3/4" flanges that you can trim off using a metal cutting blade. |
|
What do I do if I measured, but the panel was too short? You can slide one of our height extensions to get you an extra 3/4". If you need more than that you can use a piece of wood cut to size and slide that in the top channel. |
|
What does the Draft Stopper do for my sliding panel door? This will add to the insulation, as it helps to seal up the gap created by the pet door offsetting the slider so it will no longer line up with the stationary frame. These are included in all the Thermo Panel Cat Doors. |
|
Is this door energy efficient? It is one of the best and the go-to for extreme weather and high wind prone areas. Other related products like the PetSafe Freedom Aluminum Patio Panel and the Ideal Fast Fit patio panel do not offer energy efficiency close to what the Endura Flap offers. |
|
What is the difference between the Endura Flap Thermo Panel and the Endura Flap Quick Panel? The only difference is the glass. In the Thermo Panel it is dual pane lo-e and the Quick Panel is single pane. |
|
Can this doggie door fit into my sash window? The Thermo Panel is made to be a sliding glass pet door only, but if you want a pet door for your window, we have a few recommendations. The PetSafe Vertical Window Pet door is an economical solution for sash windows. Additionally, the Ideal Pet Product's "Cat Sash" Cat Door for Sash Windows. |
|
My sliding door track has a triangular guide rail. Will this pet door still work? Some sliding glass door tracks have a triangle-shaped guide rail instead of a cylindrical pencil rail running along the middle. This pet door panel has an arch along the bottom that is designed to sit on top of a cylindrical pencil rail. Pencil rails are shorter in height than triangular guide rails, which means that the pet door panel would wobble on top of it rather than sitting flush with the rest of the track. To accommodate the pet door panel you will need to build up the sides of the triangular guide rail so that the tip is less than ¼” tall. Please reach out to customer service if you have any questions about this process. |
|
Will this panel work if my sliding glass door has a buried track? Some sliding glass doors have buried tracks. Since this panel has an arch along the bottom that is designed to sit on top of a pencil rail, it will not be secure in a slider with a buried track without modifications. We recommend securing the panel to the track wall with L brackets or toenailing it to the track wall. Toenailing is the process of fastening the panel to the track by driving a nail at roughly a 45-degree angle into the panel and through the track wall. Please note that these modifications result in a semi-permanent installation. If you needed to remove the panel in the future you would first have to remove the L brackets or nails. Additionally, please note that this process would leave holes in the pet door panel and it would no longer be returnable. Please reach out to customer service to further discuss your options for a buried track. |
|
I have a hurricane patio door. Will this pet door work for me? Hurricane door track styles vary widely, so they are case-by-case. Please reach out to customer service to discuss your pet door options for your sliding door. |
|
Will this pet door work with Anderson and Pella sliding doors? Anderson and Pella sliding glass doors have an inner track wall but no outer track wall. Additionally, the pencil rail is on the outer edge of the track rather than in the middle. Since this pet door panel is designed to sit between two track walls and on top of a centered pencil rail, it cannot be installed in Anderson or Pella doors without modifications. We recommend building out your track and using L brackets or toenailing to secure the bottom of the panel to the inner track wall. Building out the track means adding a piece of wood or vinyl that is the same height as the pencil rail to the space next to the pencil rail. This creates a flat surface for the pet door panel to sit on. Next, you will need to secure the panel to the track wall. To do this, you can use L brackets or you can toenail the panel into the track wall. Toenailing is the process of fastening the panel to the track by driving a nail at roughly a 45-degree angle into the panel and through the track wall. Please note that these modifications result in a semi-permanent installation. If you needed to remove the panel in the future you would first have to remove the L brackets or nails. Additionally, please note that this process would leave holes in the pet door panel and it would no longer be returnable. Please reach out to customer service to further discuss this process or different options for an Anderson or Pella sliding door. |
|
How much does shipping cost? Shipping is calculated at checkout. |
Warranty
Warranty Type: Lifetime
Duration: Lifetime of the product.
Coverage: Defects in materials and workmanship under standard regular use.
Exclusions:
Damage caused by misuse or not using the product as intended.
Improper installation.
Damage caused by chewing.
Customer Reviews

Size Chart
- Endura Flap Thermo Panel 3e for Cats6”w x 11”h
Flap Dimensions:
6"w x 11"h
The entry way your dog goes through.Overall Panel Width
11 1/4"
How wide your panel is. Step-Over Height
3” - 5”
The distance from the bottom of the panel to the bottom of your flap.| Flap Size | Flap Dimension | Step Over Range | Overall Panel Width | Recommended Pet Height |
|---|---|---|---|---|
| Small | 6" w x 11" h | 3"-5" | 11 1/4" | 9" - 15" |
Track Height Adjustment Range is the measurement of your door height from the lowest point of your track to the highest point. Review our Track Measuring Guide. The Thermo Panel 3e Cat Door Panel comes in three adjustable ranges:
- Short - 74 3/4" - 77 3/4"
- Regular - 77 1/4" - 80 1/4"
- Tall - 93 1/4" - 96 1/4" (additional cost)
If your measured track height does not fall within one of the ranges above, we can make a custom height. Choose the range that your track height falls into and when ordered you will be asked to give the exact height of your slider track inside very top to very bottom. In each case you will have 3" of height adjustment with the height you specify approximately in the middle of that range. The ranges are:
- under 74 3/4"
- 80 1/4" - 93 1/4"
- over 96 1/4"
If your measured track height is near the bottom of the adjustment range then you should review A Note of Caution.
Find The Best Pet Door Size For My Pet
A
Pet Height: inches
B
Pet Width: inches
Installation Instructions
Difficulty
Easy
Steps
06
Time Required
0.5 hours
Sections
02
Flags
02
Parts
- Panel Pet Door
- Foam Weather Strip
- Center Post Weather Seal Draft Stopper
- Sliding Door C-Clamp Lock
- Screwdriver
Tools
- Flathead Screwdriver
Please read instructions & notes thoroughly before installation.
One-Piece Panel
Step 1 Adjust the Step Over (Optional)
- The top of the flap should be positioned to be at least 1” above the top of the pet’s shoulder.
- If the factory setting is not suitable, please adjust it before proceeding. If the current setting is suitable, proceed to the “Installation Instructions” section.
Step 2 Adjust the Screws
- Lay the entire panel on a flat surface.
- Using a #2 flat head screwdriver, remove the bottom side-screws and loosen the upper side-screws. Screws were tightly installed to hold the panel together during shipping; a power tool* is recommended.
Step 3 Adjust the Spacers
- Once the bottom screws have been removed and the upper side-screws loosened, the Pet Door Assembly and spacers can be removed by sliding the sections down and out of the panel.
Step 4 Replace the Spacers
- Replace the spacers and the Pet Door Assembly by sliding them back in a different order to achieve the desired height. You can move the spacer below and above the flap to raise or lower the flap height.
Step 5 Tighten the Screws
- When finished, replace the bottom side-screws and tighten the next upper-side screws.
Step 6 Unlock Spring Mechanism
- Loosen the height adjustment locks at the top of the pet panel with the screwdriver. This allows the spring mechanism to move freely up and down.
Step 7 Test Fit the Panel in Your Track
- To insert the panel into the top track, push up against the spring mechanism and swing the bottom of the panel up and over the threshold.
- Seat the panel on top of the small guide rail in the track.
Step 8 Apply the Weatherstripping
- Once you’re sure the panel fits, remove it from the frame and lay it on its side on the ground.
- Apply the foam weather-stripping by peeling back the paper and exposing the adhesive.
- Unroll it along the edge of the panel, pressing to ensure it adheres. Install on both sides, trim it fit with scissors.
Step 9 Install the Draft Stopper
- The center post weather seal strip (draft stopper) should be installed on the inside of the home.
- Trim with scissors as needed. Clean the edge of your patio door with rubbing alcohol before installing to assure a good seal.
- Repeat step two to install the panel in your track.
Difficulty
Easy
Steps
06
Time Required
0.5 hours
Sections
03
Flags
02
Parts
- Top Glass Panel Section
- Bottom Flap Section
- Foam Weather Strip
- Center Post Weather Seal Draft Stopper
- 4 Flathead Screws
- Flathead Screwdriver
- Screwdriver for Adjustment Locks
- Sliding Door C-Clamp Lock
Tools
- Flathead Screwdriver
Please read instructions & notes thoroughly before installation.
Two-Piece Panel
Step 1 Adjust Step Over Height (Optional)
- The top of the flap should be positioned to be at least 1” above the top of the pet’s shoulder.
- If the factory setting is not suitable, please adjust it before proceeding. If the current setting is suitable, proceed to the “Installation Instructions” section.
Step 2 Rearrange the Pieces (Optional)
- Simply slide the pieces up and out from the bottom half of your panel to rearrange.
- Loosen a bottom screw if the pieces are too snug to move.
Step 3 Reconnect the Pieces (Optional)
- Replace the spacers and the Pet Door Assembly by sliding them back in a different order to achieve the desired height.
- You can move the spacer below or above the flap to raise or lower the flap height.
Step 4 Screw the Pieces Together
- The order of the pieces is important! The piece on the bottom needs to always be at the bottom, as that is where the screws attach. You can now assemble the patio panel!
Step 5 Align the Connectors
- Remove the 2 flat head sectional connector screws from the exposed part of the connector on each side.
- Align the aluminum connectors extending from the bottom flap panel section with the top glass panel section.
- Press the aluminum connectors into the holes at the bottom of the top glass panel section.
- Ensure locking cover & height adjustment locks are on the same side!
Step 6 Tap the Pieces Together
- Gently tap the bottom surface of the panel against the ground to completely insert the connectors.
- Protect hard surfaces to prevent scratching.
- The components of the panel are designed to slide together very tightly.
Step 7 Secure the Sections
- Fasten the two panels together using the four flathead screws.
- Use the included flathead screwdriver to tighten all four flathead screws so the two halves of the door are pulled together.
Step 8 Adjust Spring Mechanism
- Loosen the height adjustment locks at the top of the pet panel. This allows the spring mechanism to move freely up and down.
Step 9 Test Fit the Panel in Your Track
- To insert the panel into the top track, push up against the spring mechanism and swing the bottom of the panel up and over the threshold.
- Seat the panel on top of the small guide rail in the track.
Step 10 Apply the Weatherstripping
- Once you’re sure the panel fits, remove it from the frame and lay it on its side on the ground.
- Apply the foam weather-stripping by peeling back the paper and exposing the adhesive.
- Unroll it along the edge of the panel, pressing to ensure it adheres. Install on both sides, trim it fit with scissors.
- Repeat step two to install the panel in your track.
Step 11 Install the Draft Stopper
- The center post weather seal strip (draft stopper) should be installed on the inside of the home.
- Trim with scissors as needed. Clean the edge of your patio door with rubbing alcohol before installing to assure a good seal.
Adjusting Stepover Height
Lock Details
Since you cannot lock your sliding door to your panel pet door, we have provided you with alternative locking methods to secure your home:
Installing the sliding door clamp: This clamp has a screw that tightens by hand to prevent the sliding door from moving beyond the clamp’s placement. For doors manufactured with the glass slider on the inside track, the lock can usually be installed on the door’s raised track.
If you aren’t able to use the lock that comes with the panel: A great alternative to locking your sliding glass door is a Charley bar or dowel in the track. Both work off the same concept – they block the slider from opening. When engaged you cannot pull the sliding door away from the pet door panel.
Other Installation Options
Semi-Permanent Installation:
You might choose to secure the panel in your track with screws. This can be done by drilling screws at an angle in the top and bottom tracks. We recommend doing this from the outside to minimize damage to the sliding glass door frame. One-way screws will prevent tampering or removal of the panel from the outside.
Stationary Panel:
Some stationary sliding door panels can be unfastened and moved over to one side so that you can install the pet door panel between the jamb and stationary panel.
Avoid damaging your sliding glass door by checking that your door can move and that you can reinstall it properly before trying to uninstall the unit.
You will still lose space in your slider to move through, however, you will be able to use your existing sliding door lock to secure your home. Installing your pet door this way is also great in that you already have an alarm system in place.
If your sliding glass door slides on the outside track, using an alternative lock might not be possible, so this allows you to still lock your door.
NOTE: You can do the stationary panel install with the regular spring actuator method – no need to screw it in.
Videos
Removing Magnets for Training with the Endura Flap
How to Measure a Sliding Glass Door for a Pet Door
FAQ
|
Can an intruder remove the Endura Flap cat door for slider from the outside? No, the thumbscrews are on the inside of the dog door panel, so once installed, the Endura Flap Panel can't be lifted out. |
|
Does the Endura Flap cat sliding door come with locking covers for security? Yes, there is a slide-in closing cover that you insert on the interior side of the panel. This closing panel will keep your pets inside and keep unwanted critters out. |
|
Do the Endura Flap panels require tools for installation? Endura Flap sliding glass doors for cats require a flathead screwdriver for the height adjustment locks. |
|
Under which height for a Endura Flap sliding cat door would it need to be custom? 74 3/4" is the smallest the off the shelf pet patio door would compress down to. |
|
At which height over 74 3/4" would a the Thermo Panel Cat door insert need to be custom? Anything from 80 1/4" - 93 1/4", and over 96 1/4" - 100" |
|
What is the absolute minimum and absolute maximum custom heights for Endura Flap Kitty Panels? The minimum still using the glass would be 35", and the maximum would be 100". |
|
What if I am outside those minimums and maximums for customs? Then you can contact us in customer service and we can see what we can do to make you a custom door outside our normal ranges. In some cases extra spacers can be used to extend the panel, or they can be used in place of the glass to get under that 35" minimum. |
|
What happens if I got a panel that was a tiny bit too tall? The top had two 3/4" flanges that you can trim off using a metal cutting blade. |
|
What do I do if I measured, but the panel was too short? You can slide one of our height extensions to get you an extra 3/4". If you need more than that you can use a piece of wood cut to size and slide that in the top channel. |
|
What does the Draft Stopper do for my sliding panel door? This will add to the insulation, as it helps to seal up the gap created by the pet door offsetting the slider so it will no longer line up with the stationary frame. These are included in all the Thermo Panel Cat Doors. |
|
Is this door energy efficient? It is one of the best and the go-to for extreme weather and high wind prone areas. Other related products like the PetSafe Freedom Aluminum Patio Panel and the Ideal Fast Fit patio panel do not offer energy efficiency close to what the Endura Flap offers. |
|
What is the difference between the Endura Flap Thermo Panel and the Endura Flap Quick Panel? The only difference is the glass. In the Thermo Panel it is dual pane lo-e and the Quick Panel is single pane. |
|
Can this doggie door fit into my sash window? The Thermo Panel is made to be a sliding glass pet door only, but if you want a pet door for your window, we have a few recommendations. The PetSafe Vertical Window Pet door is an economical solution for sash windows. Additionally, the Ideal Pet Product's "Cat Sash" Cat Door for Sash Windows. |
|
My sliding door track has a triangular guide rail. Will this pet door still work? Some sliding glass door tracks have a triangle-shaped guide rail instead of a cylindrical pencil rail running along the middle. This pet door panel has an arch along the bottom that is designed to sit on top of a cylindrical pencil rail. Pencil rails are shorter in height than triangular guide rails, which means that the pet door panel would wobble on top of it rather than sitting flush with the rest of the track. To accommodate the pet door panel you will need to build up the sides of the triangular guide rail so that the tip is less than ¼” tall. Please reach out to customer service if you have any questions about this process. |
|
Will this panel work if my sliding glass door has a buried track? Some sliding glass doors have buried tracks. Since this panel has an arch along the bottom that is designed to sit on top of a pencil rail, it will not be secure in a slider with a buried track without modifications. We recommend securing the panel to the track wall with L brackets or toenailing it to the track wall. Toenailing is the process of fastening the panel to the track by driving a nail at roughly a 45-degree angle into the panel and through the track wall. Please note that these modifications result in a semi-permanent installation. If you needed to remove the panel in the future you would first have to remove the L brackets or nails. Additionally, please note that this process would leave holes in the pet door panel and it would no longer be returnable. Please reach out to customer service to further discuss your options for a buried track. |
|
I have a hurricane patio door. Will this pet door work for me? Hurricane door track styles vary widely, so they are case-by-case. Please reach out to customer service to discuss your pet door options for your sliding door. |
|
Will this pet door work with Anderson and Pella sliding doors? Anderson and Pella sliding glass doors have an inner track wall but no outer track wall. Additionally, the pencil rail is on the outer edge of the track rather than in the middle. Since this pet door panel is designed to sit between two track walls and on top of a centered pencil rail, it cannot be installed in Anderson or Pella doors without modifications. We recommend building out your track and using L brackets or toenailing to secure the bottom of the panel to the inner track wall. Building out the track means adding a piece of wood or vinyl that is the same height as the pencil rail to the space next to the pencil rail. This creates a flat surface for the pet door panel to sit on. Next, you will need to secure the panel to the track wall. To do this, you can use L brackets or you can toenail the panel into the track wall. Toenailing is the process of fastening the panel to the track by driving a nail at roughly a 45-degree angle into the panel and through the track wall. Please note that these modifications result in a semi-permanent installation. If you needed to remove the panel in the future you would first have to remove the L brackets or nails. Additionally, please note that this process would leave holes in the pet door panel and it would no longer be returnable. Please reach out to customer service to further discuss this process or different options for an Anderson or Pella sliding door. |
|
How much does shipping cost? Shipping is calculated at checkout. |
Warranty
Warranty Type: Lifetime
Duration: Lifetime of the product.
Coverage: Defects in materials and workmanship under standard regular use.
Exclusions:
Damage caused by misuse or not using the product as intended.
Improper installation.
Damage caused by chewing.