


Cat Mate Elite 355 Chip & Disc Electronic Pet Door
- Regular price
- $259.99
- Sale price
- $259.99
- Regular price
-
- Unit price
- per


- Microchip and Elite I.D. Disc (sold separately) compatibility ensures secure entry for your cat
- Timer control for customized access and tracking of up to 9 cats
- Weatherstripping-lined flap for maximum insulation and energy efficiency
- Installs in doors or walls up to 4 inches thick with optional Wall Adaptor Tunnel
- Clear, rigid Polypropylene flap allows easy passage for pets
 Product Details
Product Details
Experience the perfect blend of security and convenience with the Cat Mate "Elite" 355 Chip & Disc Electronic Pet Door. This advanced pet door is designed to provide your cat with exclusive access to your home, keeping unwanted intruders out. Compatible with both microchips and Elite I.D. Disc collar keys, this door can accommodate up to 9 cats and track the location of 3 cats, granting you peace of mind and control over your cat's comings and goings. It's microchip-sensing technology is perfect for cats who don't wear collars.
The 6x6 inch opening may be slightly small for larger cats, but it is perfect for average-sized felines.
The Cat Mate Elite 355 features a timer control function that allows you to set specific access times and curfews, ensuring your cat stays safely indoors during the night. The 4-way locking system offers even greater control over your cat's movements, allowing you to set the door to locked, unlocked, in-only, or out-only.
Energy efficiency is a priority with this pet door. The weatherstripping-lined flap protects your home from drafts and maintains optimal insulation. The clear, rigid Polypropylene flap is designed for ease of use, allowing your pet to push through without difficulty.
Installation is a breeze with the Cat Mate Elite 355, suitable for doors or walls up to 4 inches thick. For thicker walls, an optional Wall Adaptor Tunnel is available. The pet door is compatible with various doors, walls, and window types, providing versatility for any home.
Features:
- Controls access for up to 9 cats. LCD screen displays the location of up to 3 of your cats by recording their movement through the cat flap.
- Automatic cat door compatible with all popular microchips. Pets who are not yet microchipped can start with the RFID collar key and then switch to the chip.
- Exclusive entry for your cat using microchip or Elite I.D. Disc collar key
- Monitor and manage the location of up to 3 cats through the door
- 4-way locking system for added control over your cat's access
- Timer feature enables customized access settings and curfews
- Easy installation in various doors, walls, and window types
Benefits:
- Smart cat door with microchip technology keeps intruders out of your home.
- Best pet door to give cats the freedom to come and go as they please within time frames designated by you.
- Great for cats who don't like wearing bulky, uncomfortable collars.
- If your pet is not yet microchipped, you can start with the collar key and switch to the chip whenever it is most convenient.
- Timer feature of locking pet door is perfect for keeping cats in at night.
- 3-year limited warranty.


Size Chart
- Cat Mate "Elite" 355 Chip & Disc Electronic Pet Door6"w x 6"h
Flap Dimensions:
6"w x 6"h
The entry way your dog goes through.Outside Frame Dimensions
7 3/4"w x 9 11/16"h
The outer edge of the pet door.


Rough Cut Out:
7 1/16"w x 8 1/16"h
The size of the hole needed to fit your pet door into your door.Flap Dimensions:
6"w x 6"h
Double Flap:6"w x 10"h
The entry way your dog goes through.Outside Frame Dimensions
7 3/4"w x 9 11/16"h
The outer edge of the pet door.


Rough Cut Out:
7 1/16"w x 8 1/16"h
The size of the hole needed to fit your pet door into your door.Flap Dimensions:
6"w x 6"h
Double Flap:6"w x 10"h
The entry way your dog goes through.Outside Frame Dimensions
7 3/4"w x 9 11/16"h
The outer edge of the pet door.


Rough Cut Out:
7 1/16"w x 8 1/16"h
The size of the hole needed to fit your pet door into your door.Flap Dimensions:
6"w x 6"h
Double Flap:6"w x 10"h
The entry way your dog goes through.Outside Frame Dimensions
7 3/4"w x 9 11/16"h
The outer edge of the pet door.


Rough Cut Out:
7 1/16"w x 8 1/16"h
The size of the hole needed to fit your pet door into your door.| Flap Model | Flap Size | Flap Dimension | Rough Cut Out | Frame Dimension | Recommended Pet Height |
|---|---|---|---|---|---|
| Elite 356 Selective (Discontinued) | Cat Flap | 6" w x 6" h | 7 1/16 " w x 8 1/16" h | 7-3/4"w x 9-11/16"h | (Discontinued) |
| Elite 355 Super Selective | 4" - 9" |
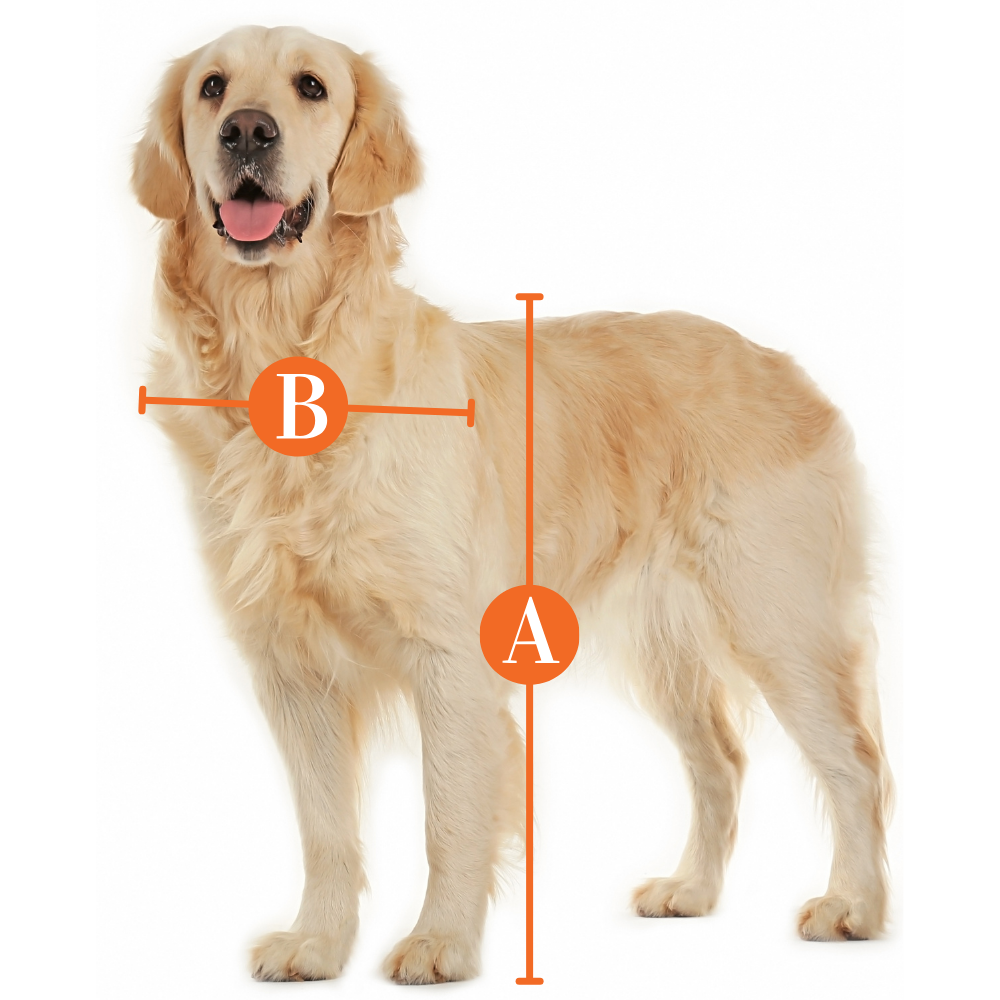
Find The Best Pet Door Size For My Pet

A
Pet Height: inches
B
Pet Width: inches
Installation Instructions
Installing in a Door

 Difficulty
Moderate
Difficulty
Moderate
 Steps
03
Steps
03
 Time Required
1-2 hours
Time Required
1-2 hours
 Sections
01
Sections
01
 Flags
00
Flags
00
Parts
- Interior Frame
- Exterior Frame
- Screws
- Screw Caps
Tools
- Jigsaw
- Pencil
- Drill
Read the full Cat Mate Elite Installation Guide here.
Step 1 For Wood Doors:
- Place the exterior frame in the desired position on the door. We recommend the bottom of the flap to be installed approximately 6” above the ground for utmost comfort.
- Trace a line around the flap opening. Use an electronic jigsaw to cut 3/16” outside the line.
- Determine the thickness of the door panel to determine required screw length.
- Hold the interior and exterior frame in position and mark the two screw holes.
- Remove the frames and drill screw holes in the panels to ¼” diameter.
- Position the interior frame on the inside of door and screw exterior frame to it by using appropriate screws for door thickness. (If necessary, cut supplied screws to length). Fit in the two screw caps.
- Remove batteries for at least two minutes after installation to allow the cat flap to retune itself to its new location for optimal performance.
Step 2 For Metal Doors:
- Place the exterior frame in desired position on the door. We recommend the bottom of the flap to be installed approximately 6” above the ground for utmost comfort.
- Trace a line around the OUTSIDE of the frame. Use an electronic jigsaw to cut ½” INSIDE the line. Be careful to cut the hole square to the door, particularly with thicker doors. Ensure that the interior frame is free fitting in the hole.
- Position the interior frame on the inside of door and screw exterior frame to it by using appropriate screws for door thickness. (If necessary, cut supplied screws to length). Fit in the two screw caps.
- Remove batteries for at least two minutes after installation to allow the cat flap to retune itself to its new location for optimal performance.
Step 3 Fitting RFID Collar Keys
- If desired, record your cat’s details on the ID disc label by writing on the label in pen and sticking the clear waterproof cover over the writing.
- Attach the Disc directly to the collar, NOT from a ring attached to the collar.
- Any other metal will interfere with the sensing system on the door.
- This way it is as high as possible and parallel to flap. We recommend the use of a fabric collar without large metal attachments, like other ID tags, etc.
Installing in a Wall
Difficulty
High
Steps
04
Time Required
2-3 hours
Sections
01
Flags
01
Parts
- Cat Mate Elite Wall Liners
- Interior Frame
- Exterior Frame
- Screws and Screw Covers
Tools
- Tape Measure
- Drill
- Level
- Pencil
- Tools for cutting wall
- Drill
- Tape
- Plastic Sheeting
- Pliers
- Screwdriver
Read the full Cat Mate Elite Installation Guide here.
Step 1 Prepare for Rough Cut Out
- Make sure that you measure the thickness of your wall and have the correct number of wall liners needed before making any rough openings in your wall.
- For the bottom of the cut-out, make sure that it is level with your pet’s belly to ensure comfort when in use.
- Next you will have to make a rectangular cut out in the wall that is 7” wide by 8” high. Using a level and pencil, mark the outside lines of your cut-out on the wall. Then check one more time that the line is straight and level.
Step 2 Make the Rough Cutout
- Now you will want to cut the hole out, by first cutting the interior wall and then removing any insulation.
- Next, drill holes from the inside through the exterior wall and use those as pilot holes for the outside cut. Be sure to remeasure on the outside for accuracy.
- Tape up the inside hole with plastic sheeting before cutting the outside wall. This will make clean up much easier.
- Cut out the exterior wall.
Step 3 Prepare the Frames
- Take the pet door and remove the battery cover.
- Remove the interior frame cover entirely by taking out the two screws on the backside of the frame. Then remove the two screws that are under the battery cover.
- Remove the metal screw clips on the back using pliers.
- Take the wall liners and fit them onto the flap frame whose cover you previously removed.
- The manufacturer recommends pushing them together firmly, but glue can be used if you feel it would be more secure.
Step 4 Secure the Frames
- The screw holes should be visible about halfway down the left and right side of the frame. You will need to put a washer under each screw.
- Take the frame and screw it to the wall, putting the liners through the cut-out.
- Put the inside frame cover back on using the screws you removed and replace the battery cover. Make sure that you do not trap any of the electrical wires.
- Finally, fit the exterior frame on using two of the 1” screws. Then fit the hole covers and you are finished.
FAQ
|
How does the LCD display work? The Cat Mate Electronic I.D. Disc microchip cat flap's LCD display shows cat location, exit lock status, and the low battery indicator. |
|
What's the main difference between this door and the Cat Mate Elite 305 Super Selective cat flap? The Cat Mate Elite Super Selective cat flap is not a microchip pet door. It requires an RFID collar tag on your cat's collar to give your pet access inside and out. If you have a cat that cannot wear a collar ID, it would not be a good option for you. |
|
Can I install this dog door into a wall? Yes. The Cat Mate Elite Microchip Cat Flap is self-lining and can be installed into surfaces up to 4" thick, making it great for installing into single and double glazing, doors and door panels, and walls. If installing into a wall that is thicker, you may need to invest in a Pet Mate wall liner. |
|
Does this need electricity to run? Yes, the elite selective cat door needs battery power in order to work. The door does have a training mode that turns off the microchip and collar tag sensing so that the door works like a manual cat flap. |
|
What are the other 4-way locking cat flaps options out there? For microchip pet doors, the Sureflap Dualscan is raccoon-proof and allows you to set access controls for up to 32 separate pets. The Petsafe Indoor Cat Flap is non-electronic and also has a 4-way locking feature. |
|
How much does shipping cost? Shipping is calculated at checkout. |
Warranty
Cat Mate/ Dog Mate/ Ani Mate 3 Year Limited Warranty
Guarantees your purchase for a period of three years from the date of original purchase against any defect arising due to faulty materials or manufacture. Accordingly, any defective item will be repaired free of charge or replaced at the manufacturer’s option provided that the defect has not been caused by neglect, misuse, or normal wear and tear and proof of purchase date is supplied. Your statutory rights are not affected.
Customer Reviews

Size Chart
- Cat Mate "Elite" 355 Chip & Disc Electronic Pet Door6"w x 6"h
Flap Dimensions:
6"w x 6"h
The entry way your dog goes through.Outside Frame Dimensions
7 3/4"w x 9 11/16"h
The outer edge of the pet door. Rough Cut Out:
7 1/16"w x 8 1/16"h
The size of the hole needed to fit your pet door into your door.Flap Dimensions:
6"w x 6"h
Double Flap:6"w x 10"h
The entry way your dog goes through.Outside Frame Dimensions
7 3/4"w x 9 11/16"h
The outer edge of the pet door. Rough Cut Out:
7 1/16"w x 8 1/16"h
The size of the hole needed to fit your pet door into your door.Flap Dimensions:
6"w x 6"h
Double Flap:6"w x 10"h
The entry way your dog goes through.Outside Frame Dimensions
7 3/4"w x 9 11/16"h
The outer edge of the pet door. Rough Cut Out:
7 1/16"w x 8 1/16"h
The size of the hole needed to fit your pet door into your door.Flap Dimensions:
6"w x 6"h
Double Flap:6"w x 10"h
The entry way your dog goes through.Outside Frame Dimensions
7 3/4"w x 9 11/16"h
The outer edge of the pet door. Rough Cut Out:
7 1/16"w x 8 1/16"h
The size of the hole needed to fit your pet door into your door.| Flap Model | Flap Size | Flap Dimension | Rough Cut Out | Frame Dimension | Recommended Pet Height |
|---|---|---|---|---|---|
| Elite 356 Selective (Discontinued) | Cat Flap | 6" w x 6" h | 7 1/16 " w x 8 1/16" h | 7-3/4"w x 9-11/16"h | (Discontinued) |
| Elite 355 Super Selective | 4" - 9" |
Find The Best Pet Door Size For My Pet
A
Pet Height: inches
B
Pet Width: inches
Installation Instructions
Installing in a Door
Difficulty
Moderate
Steps
03
Time Required
1-2 hours
Sections
01
Flags
00
Parts
- Interior Frame
- Exterior Frame
- Screws
- Screw Caps
Tools
- Jigsaw
- Pencil
- Drill
Read the full Cat Mate Elite Installation Guide here.
Step 1 For Wood Doors:
- Place the exterior frame in the desired position on the door. We recommend the bottom of the flap to be installed approximately 6” above the ground for utmost comfort.
- Trace a line around the flap opening. Use an electronic jigsaw to cut 3/16” outside the line.
- Determine the thickness of the door panel to determine required screw length.
- Hold the interior and exterior frame in position and mark the two screw holes.
- Remove the frames and drill screw holes in the panels to ¼” diameter.
- Position the interior frame on the inside of door and screw exterior frame to it by using appropriate screws for door thickness. (If necessary, cut supplied screws to length). Fit in the two screw caps.
- Remove batteries for at least two minutes after installation to allow the cat flap to retune itself to its new location for optimal performance.
Step 2 For Metal Doors:
- Place the exterior frame in desired position on the door. We recommend the bottom of the flap to be installed approximately 6” above the ground for utmost comfort.
- Trace a line around the OUTSIDE of the frame. Use an electronic jigsaw to cut ½” INSIDE the line. Be careful to cut the hole square to the door, particularly with thicker doors. Ensure that the interior frame is free fitting in the hole.
- Position the interior frame on the inside of door and screw exterior frame to it by using appropriate screws for door thickness. (If necessary, cut supplied screws to length). Fit in the two screw caps.
- Remove batteries for at least two minutes after installation to allow the cat flap to retune itself to its new location for optimal performance.
Step 3 Fitting RFID Collar Keys
- If desired, record your cat’s details on the ID disc label by writing on the label in pen and sticking the clear waterproof cover over the writing.
- Attach the Disc directly to the collar, NOT from a ring attached to the collar.
- Any other metal will interfere with the sensing system on the door.
- This way it is as high as possible and parallel to flap. We recommend the use of a fabric collar without large metal attachments, like other ID tags, etc.
Installing in a Wall
Difficulty
High
Steps
04
Time Required
2-3 hours
Sections
01
Flags
01
Parts
- Cat Mate Elite Wall Liners
- Interior Frame
- Exterior Frame
- Screws and Screw Covers
Tools
- Tape Measure
- Drill
- Level
- Pencil
- Tools for cutting wall
- Drill
- Tape
- Plastic Sheeting
- Pliers
- Screwdriver
Read the full Cat Mate Elite Installation Guide here.
Step 1 Prepare for Rough Cut Out
- Make sure that you measure the thickness of your wall and have the correct number of wall liners needed before making any rough openings in your wall.
- For the bottom of the cut-out, make sure that it is level with your pet’s belly to ensure comfort when in use.
- Next you will have to make a rectangular cut out in the wall that is 7” wide by 8” high. Using a level and pencil, mark the outside lines of your cut-out on the wall. Then check one more time that the line is straight and level.
Step 2 Make the Rough Cutout
- Now you will want to cut the hole out, by first cutting the interior wall and then removing any insulation.
- Next, drill holes from the inside through the exterior wall and use those as pilot holes for the outside cut. Be sure to remeasure on the outside for accuracy.
- Tape up the inside hole with plastic sheeting before cutting the outside wall. This will make clean up much easier.
- Cut out the exterior wall.
Step 3 Prepare the Frames
- Take the pet door and remove the battery cover.
- Remove the interior frame cover entirely by taking out the two screws on the backside of the frame. Then remove the two screws that are under the battery cover.
- Remove the metal screw clips on the back using pliers.
- Take the wall liners and fit them onto the flap frame whose cover you previously removed.
- The manufacturer recommends pushing them together firmly, but glue can be used if you feel it would be more secure.
Step 4 Secure the Frames
- The screw holes should be visible about halfway down the left and right side of the frame. You will need to put a washer under each screw.
- Take the frame and screw it to the wall, putting the liners through the cut-out.
- Put the inside frame cover back on using the screws you removed and replace the battery cover. Make sure that you do not trap any of the electrical wires.
- Finally, fit the exterior frame on using two of the 1” screws. Then fit the hole covers and you are finished.
FAQ
|
How does the LCD display work? The Cat Mate Electronic I.D. Disc microchip cat flap's LCD display shows cat location, exit lock status, and the low battery indicator. |
|
What's the main difference between this door and the Cat Mate Elite 305 Super Selective cat flap? The Cat Mate Elite Super Selective cat flap is not a microchip pet door. It requires an RFID collar tag on your cat's collar to give your pet access inside and out. If you have a cat that cannot wear a collar ID, it would not be a good option for you. |
|
Can I install this dog door into a wall? Yes. The Cat Mate Elite Microchip Cat Flap is self-lining and can be installed into surfaces up to 4" thick, making it great for installing into single and double glazing, doors and door panels, and walls. If installing into a wall that is thicker, you may need to invest in a Pet Mate wall liner. |
|
Does this need electricity to run? Yes, the elite selective cat door needs battery power in order to work. The door does have a training mode that turns off the microchip and collar tag sensing so that the door works like a manual cat flap. |
|
What are the other 4-way locking cat flaps options out there? For microchip pet doors, the Sureflap Dualscan is raccoon-proof and allows you to set access controls for up to 32 separate pets. The Petsafe Indoor Cat Flap is non-electronic and also has a 4-way locking feature. |
|
How much does shipping cost? Shipping is calculated at checkout. |
Warranty
Cat Mate/ Dog Mate/ Ani Mate 3 Year Limited Warranty
Guarantees your purchase for a period of three years from the date of original purchase against any defect arising due to faulty materials or manufacture. Accordingly, any defective item will be repaired free of charge or replaced at the manufacturer’s option provided that the defect has not been caused by neglect, misuse, or normal wear and tear and proof of purchase date is supplied. Your statutory rights are not affected.