


Endura Flap Severe Weather Vinyl Sliding Glass Dog Door


- Double-flap system with superior insulation, designed for extreme weather conditions, maintaining flexibility in temperatures as low as -40°F and standing up to 50mph winds.
- Built for vinyl sliding glass doors with a minimum 1-1/2" thick ‘U’ shaped track, ensuring a precise, semi-permanent fit.
- 1/2" clear, insulated, dual-pane Low-E safety glass maximizes energy efficiency while allowing natural light into your home.
- Spring-loaded panel allows easy installation and removal, making it ideal for rentals and vacation homes.
- White vinyl frame seamlessly integrates with sliding glass doors for a clean, unobtrusive appearance.
- Locking cover and C-clamp lock provide additional security when needed.
- Available in multiple sizes, from small to extra-large, to accommodate pets of all sizes.
 Product Details
Product Details
Designed for extreme climates, the Endura Flap Severe Weather Vinyl Sliding Glass Dog Door is engineered to keep your home insulated while giving your pet the freedom to go outside. This dual-flap pet door uses high-quality magnets to stay sealed in high winds, while its Low-E safety glass reduces heat transfer, helping maintain comfortable indoor temperatures year-round.
The panel fits vinyl sliding glass doors with a minimum 1 ½" track thickness, ensuring a secure fit without the need for permanent modifications. The spring-loaded design allows for simple installation and easy removal when necessary, making it an excellent choice for rentals or seasonal use. 5/16" can be trimmed off the top of pet door panel if you need it slightly shorter to fit.
A sturdy locking cover and C-clamp lock provide extra security when the door is not in use.
Available in various sizes to accommodate different pets, this energy-efficient pet door offers convenience, durability, and protection against the elements. With its weather-resistant construction and seamless vinyl finish, the Endura Flap Severe Weather Vinyl Sliding Glass Dog Door is the ideal solution for households in extreme climates looking for a long-lasting, insulated pet access option.


Size Chart
| Flap Size | Flap Dimension | Step Over Height | Overall Panel Width | Recommended Pet Height |
|---|---|---|---|---|
| Small | 6" w x 10" h | 3 3/10" | 12 3/8" | 8" - 14" |
| Medium | 8" w x 14" h | 3 3/10" | 14 3/8" | 8" - 21" |
| Large | 10" w x 18" h | 6 3/5" | 16 7/16" | 8" - 31" |
| Extra Large | 12" w x 22" h | 6 3/5" | 18 1/2" | 8" - 36" |
The recommended pet width is generally 1" – 2" added to the width of the flap. Step-Over is non-adjustable for all vinyl Endura Flap panels.
Your Track Height Adjustment Range is the measurement of your door height from the lowest point of your track to the highest point. Review our Track Measuring Guide for more information. The Endura Flap Severe Weather Vinyl Sliding Glass Dog Door comes in two standard adjustable ranges:
- Short: 74 3⁄4" – 77 3⁄4"
- Regular: 77 1⁄4" – 80 1⁄4"
- Tall: 93 1⁄4" – 96 1⁄4" (additional cost)
If your measured track height is near the bottom of the adjustment range then you should review a Note of Caution.
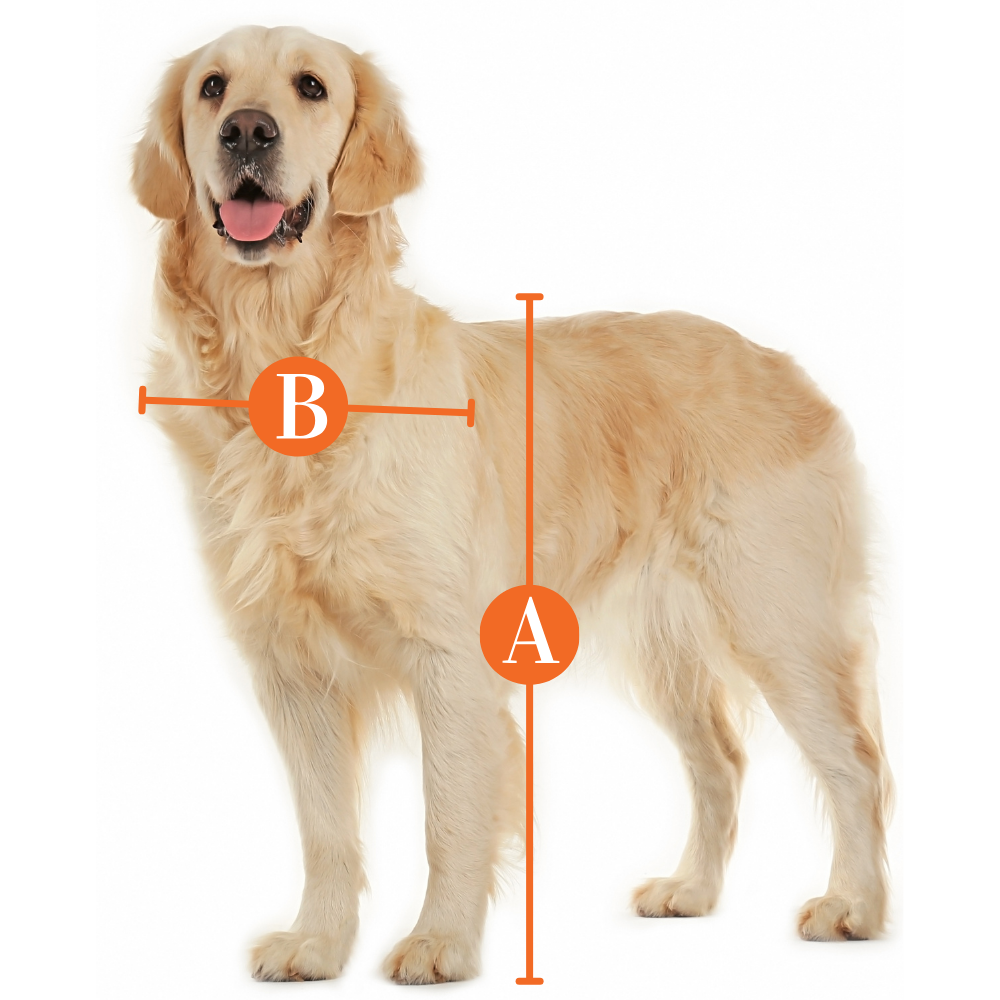
Find The Best Pet Door Size For My Pet

A
Pet Height: inches
B
Pet Width: inches
Installation Instructions
 Difficulty
Easy
Difficulty
Easy
 Steps
10
Steps
10
 Time Required
0.5 hours
Time Required
0.5 hours
 Sections
01
Sections
01
 Flags
01
Flags
01
Parts
- 1 Vinyl Panel Pet Door
- 1 Weatherstrip Seal Roll
- 1 Center Post Weather Seal Draft Stopper
Tools
- Flathead screwdriver
- #2 Philips head screw driver
- Non-metal hammer
- Scissors
Please read instructions & notes thoroughly before installation.
Step 1 Loosen Height Adjustment Locks

- Loosen the height adjustment locks at the top of the panel. This allows the spring mechanism to move freely up and down.
Step 2 Insert Panel Into Track

- Insert the panel into the upper track of your door frame, push the panel into the spring mechanism, then swing the bottom of the panel up and over the threshold into the lower track rail.
Step 3 Apply Weatherstrip

- Once you are confident that the panel fits, remove the panel from the track and lay it on its side on the ground.
- Apply the foam weatherstrip seal by peeling back the paper and exposing the adhesive. Unroll it along the edge of the panel, pressing to ensure it adheres. Install on both sides and trim to fit with scissors.
Step 4 Place Panel In Track
- Place the panel back into the sliding glass door, then tighten the height adjustment locks to lock it in place.
Step 5 Install the Draft Stopper

- The center post weather seal strip (draft stopper) should be installed on the inside of the home.
- Trim with scissors as needed. Clean the edge of your patio door with rubbing alcohol before installing to assure a good seal.
- Repeat step two to install the panel in your track.
The following steps are only applicable if you need to adjust the step-over height. Complete these steps prior to installing the panel in your track.
Step A Separate Flap Frames

- Lay the entire panel on a flat surface. Use a #2 Philips head screwdriver to unscrew the four frame screws from the flap frames to separate them, then set them aside.
Step B Loosen Side-Screws

- Loosen both the middle and bottom sets of side-screws by one turn.
Step C Adjust Stepover Height

- Once the bottom and middle side-screws are loosened, slide the spacer(s) down to the bottom of the panel. Pull the adjustable seal extrusion(s) down and out to place it between the adjustable spacer and the adjacent crosspiece.
- You can move the spacer(s) above or below the flap to raise or lower it until the desired flap height is achieved.
Step D Replace Side and Middle Screws

- Once the desired flap height is achieved, replace and tighten the bottom side-screws and tighten the middle side-screws.
Step E Reattach Flap Frames

- To reinstate the pet door assembly, sandwich the interior and exterior frames on either side of the pane how they came. Insert the four frame screws through the pet door frames.
Step F Add Hole Plugs
- Use the wooden of a hammer, a rubber mallet, or another non-metal tool to tap the hole plugs over the eight exposed frame screws.
FAQ
What if my panel is slightly too tall?
You can trim up to 5/16" off the spring-loaded adjustment piece at the top. Remove the adjustment piece with a #2 Philips head screwdriver and use scissors to cut down the flanges. Be careful not to cut too low.


What if my panel is slightly too short?
We ofer height extensions that will add 1 1/2" to the top of the panel that you slide into the channel at the top. These are made from the same vinyl as the panel so the color will match exactly. If the extension makes the panel feel unstable, you can secure it with screws.

What if the panel is wobbling slightly back and forth?
If your track is wider than 1 1/2", you can use small wooden shims or extra weather-stripping to fill the gap inside the top and bottom tracks. By placing the material inside the tracks you won't be able to see it, but it will stabilize the panel.
Locking Your Door
Since you cannot lock your sliding glass door to the panel, we have provided you with a sliding door clamp lock to secure your home.
Installing the sliding door clamp:
This clamp as a screw that tightens by hand to prevent the sliding door from moving beyond the clamp's placement. For doors manufactured with the glass slider on the inside track, the lock can usually be installed on the door's raised track.

If you aren't able to use the lock that comes with the panel:
A great alternative to locking your sliding glass door is a Charley bar or dowel. Both block the slider from opening. When engaged, you cannot pull the sliding door away from the pet door panel.

Videos
How to Measure Your Sliding Glass Door for a Pet Door
How to Adjust Your Endura Flap Magnet Strength
FAQ
|
Is this the same as the Thermo Panel 3e? This is very similar in that it has the same height ranges, flap sizes, Endura Flap, and Low-e glass. However this one is specifically made to fit better in the wider vinyl slider tracks. |
|
Will this fit all vinyl doors? This will work in doors that have a recessed track at least 1 1/2" wide, with a rail in the bottom that is about the size of a pencil. The panel is made with a small channel that will case over that little rail |
|
Does it lock? We do include a c-clamp lock. It is not designed to mate with your existing sliding door lock. You can also use a Charley-Bar or dowel in the track. |
|
Can I install it myself? It is meant to easily be put in and removed. You just have to loosen the screws at the top, fit it into the track, and then tighten them. Then to remove it you simply loosen them again and pop it out. |
|
If you can remove it what prevents intruders from taking it out? The thumb screws are on the inside of the house so you can't loosen them from the outside. |
|
Can you lock the pet door? It comes with a closing cover, and you slide that in on the inside of the house. It is a very secure ABS plastic material that is as strong as a 16 gauge steel. |
|
Does this insulate well? This door has superior insulating capabilities! The flap has magnets that seal all the way around, and will stay closed in wind gusts up to 50mph. The Low-e glass also compliments the insulating value of you new vinyl door. It is our #1 recommendation for extreme climates. |
|
What does the recommended pet height mean? That column is what we recommend be the range of pet height that would be suitable for that particular flap size. So for example if you pet is 20"tall and could fit though a 10" wide opening, then you could go with the large flap. |
|
How to I measure for it? You will want to measure from the deepest part (down past the little metal rail) in the bottom, then all the way up to the deepest part inside the top track. |
|
Does it come in any color other than white? No, but the you can paint the vinyl to match. |
|
What if my track is wider than 1 1/2"? It can still work if your track is wider, but if the channel in the bottom, top, or side measures less than that you will not be able to fit it into place properly. |
|
Does your door have to be vinyl? No, not as long as the track height and width meet the panel specs. |
|
What are some breeds of dogs these will fit? Small would be Chihuahuas, Yorkies, and cats. Medium would be good for Corgis, Jack Russell Terriers, and French Bulldogs. Large would fit most Labs, Goldens, and Pit Bulls. Extra Large would be good for most Rottweilers, German Shepherds on the large side, and English Labs. |
|
Is the flap flexible? It is flexible, but since it is two pieces sandwiched together it is a little stiffer and heavier than the more economical vinyl flaps. |
|
Is the flap clear? It is a little foggy, but it is see through. |
|
Will this form condensation like the aluminum panels? Nope! That is one of the great things about the vinyl framing is you won't have the the condensation on the inside of the house. |
|
How do you replace the flap? Since this is really our door mount version of the Endura Flap installed onto our vinyl panel you would replace it much like you would one installed in a regular interior/exterior door. This means that you would drill out the hole plugs to remove the screws. Then pull off the flap assembly, switch out the flaps, and reinstall the door onto the panel. All of this can be done without removing the panel from the track. |
|
Is there an electronic version of this panel? We do hope to offer that option in the future, but right now we are offering only the Endura Flap options. |
|
My sliding door track has a triangular guide rail. Will this pet door still work? Some sliding glass door tracks have a triangle-shaped guide rail instead of a cylindrical pencil rail running along the middle. This pet door panel has an arch along the bottom that is designed to sit on top of a cylindrical pencil rail. Pencil rails are shorter in height than triangular guide rails, which means that the pet door panel would wobble on top of it rather than sitting flush with the rest of the track. To accommodate the pet door panel you will need to build up the sides of the triangular guide rail so that the tip is less than ¼” tall. Please reach out to customer service if you have any questions about this process. |
|
Will this panel work if my sliding glass door has a buried track? Some sliding glass doors have buried tracks. Since this panel has an arch along the bottom that is designed to sit on top of a pencil rail, it will not be secure in a slider with a buried track without modifications. We recommend securing the panel to the track wall with L brackets or toenailing it to the track wall. Toenailing is the process of fastening the panel to the track by driving a nail at roughly a 45-degree angle into the panel and through the track wall. Please note that these modifications result in a semi-permanent installation. If you needed to remove the panel in the future you would first have to remove the L brackets or nails. Additionally, please note that this process would leave holes in the pet door panel and it would no longer be returnable. Please reach out to customer service to further discuss your options for a buried track. |
|
I have a hurricane patio door. Will this pet door work for me? Hurricane door track styles vary widely, so they are case-by-case. Please reach out to customer service to discuss your pet door options for your sliding door. |
|
Will this pet door work with Anderson and Pella sliding doors? Anderson and Pella sliding glass doors have an inner track wall but no outer track wall. Additionally, the pencil rail is on the outer edge of the track rather than in the middle. Since this pet door panel is designed to sit between two track walls and on top of a centered pencil rail, it cannot be installed in Anderson or Pella doors without modifications. We recommend building out your track and using L brackets or toenailing to secure the bottom of the panel to the inner track wall. Building out the track means adding a piece of wood or vinyl that is the same height as the pencil rail to the space next to the pencil rail. This creates a flat surface for the pet door panel to sit on. Next, you will need to secure the panel to the track wall. To do this, you can use L brackets or you can toenail the panel into the track wall. Toenailing is the process of fastening the panel to the track by driving a nail at roughly a 45-degree angle into the panel and through the track wall. Please note that these modifications result in a semi-permanent installation. If you needed to remove the panel in the future you would first have to remove the L brackets or nails. Additionally, please note that this process would leave holes in the pet door panel and it would no longer be returnable. Please reach out to customer service to further discuss this process or different options for an Anderson or Pella sliding door. |
|
How much does shipping cost? Shipping is calculated at checkout. |
Warranty
Warranty Type: Lifetime
Duration: Lifetime of the product.
Coverage: Defects in materials and workmanship under standard regular use.
Exclusions:
Damage caused by misuse or not using the product as intended.
Improper installation.
Damage caused by chewing.
Customer Reviews

Size Chart
| Flap Size | Flap Dimension | Step Over Height | Overall Panel Width | Recommended Pet Height |
|---|---|---|---|---|
| Small | 6" w x 10" h | 3 3/10" | 12 3/8" | 8" - 14" |
| Medium | 8" w x 14" h | 3 3/10" | 14 3/8" | 8" - 21" |
| Large | 10" w x 18" h | 6 3/5" | 16 7/16" | 8" - 31" |
| Extra Large | 12" w x 22" h | 6 3/5" | 18 1/2" | 8" - 36" |
The recommended pet width is generally 1" – 2" added to the width of the flap. Step-Over is non-adjustable for all vinyl Endura Flap panels.
Your Track Height Adjustment Range is the measurement of your door height from the lowest point of your track to the highest point. Review our Track Measuring Guide for more information. The Endura Flap Severe Weather Vinyl Sliding Glass Dog Door comes in two standard adjustable ranges:
- Short: 74 3⁄4" – 77 3⁄4"
- Regular: 77 1⁄4" – 80 1⁄4"
- Tall: 93 1⁄4" – 96 1⁄4" (additional cost)
If your measured track height is near the bottom of the adjustment range then you should review a Note of Caution.
Find The Best Pet Door Size For My Pet
A
Pet Height: inches
B
Pet Width: inches
Installation Instructions
Difficulty
Easy
Steps
10
Time Required
0.5 hours
Sections
01
Flags
01
Parts
- 1 Vinyl Panel Pet Door
- 1 Weatherstrip Seal Roll
- 1 Center Post Weather Seal Draft Stopper
Tools
- Flathead screwdriver
- #2 Philips head screw driver
- Non-metal hammer
- Scissors
Please read instructions & notes thoroughly before installation.
Step 1 Loosen Height Adjustment Locks
- Loosen the height adjustment locks at the top of the panel. This allows the spring mechanism to move freely up and down.
Step 2 Insert Panel Into Track
- Insert the panel into the upper track of your door frame, push the panel into the spring mechanism, then swing the bottom of the panel up and over the threshold into the lower track rail.
Step 3 Apply Weatherstrip
- Once you are confident that the panel fits, remove the panel from the track and lay it on its side on the ground.
- Apply the foam weatherstrip seal by peeling back the paper and exposing the adhesive. Unroll it along the edge of the panel, pressing to ensure it adheres. Install on both sides and trim to fit with scissors.
Step 4 Place Panel In Track
- Place the panel back into the sliding glass door, then tighten the height adjustment locks to lock it in place.
Step 5 Install the Draft Stopper
- The center post weather seal strip (draft stopper) should be installed on the inside of the home.
- Trim with scissors as needed. Clean the edge of your patio door with rubbing alcohol before installing to assure a good seal.
- Repeat step two to install the panel in your track.
The following steps are only applicable if you need to adjust the step-over height. Complete these steps prior to installing the panel in your track.
Step A Separate Flap Frames
- Lay the entire panel on a flat surface. Use a #2 Philips head screwdriver to unscrew the four frame screws from the flap frames to separate them, then set them aside.
Step B Loosen Side-Screws
- Loosen both the middle and bottom sets of side-screws by one turn.
Step C Adjust Stepover Height
- Once the bottom and middle side-screws are loosened, slide the spacer(s) down to the bottom of the panel. Pull the adjustable seal extrusion(s) down and out to place it between the adjustable spacer and the adjacent crosspiece.
- You can move the spacer(s) above or below the flap to raise or lower it until the desired flap height is achieved.
Step D Replace Side and Middle Screws
- Once the desired flap height is achieved, replace and tighten the bottom side-screws and tighten the middle side-screws.
Step E Reattach Flap Frames
- To reinstate the pet door assembly, sandwich the interior and exterior frames on either side of the pane how they came. Insert the four frame screws through the pet door frames.
Step F Add Hole Plugs
- Use the wooden of a hammer, a rubber mallet, or another non-metal tool to tap the hole plugs over the eight exposed frame screws.
FAQ
What if my panel is slightly too tall?
You can trim up to 5/16" off the spring-loaded adjustment piece at the top. Remove the adjustment piece with a #2 Philips head screwdriver and use scissors to cut down the flanges. Be careful not to cut too low.
What if my panel is slightly too short?
We ofer height extensions that will add 1 1/2" to the top of the panel that you slide into the channel at the top. These are made from the same vinyl as the panel so the color will match exactly. If the extension makes the panel feel unstable, you can secure it with screws.
What if the panel is wobbling slightly back and forth?
If your track is wider than 1 1/2", you can use small wooden shims or extra weather-stripping to fill the gap inside the top and bottom tracks. By placing the material inside the tracks you won't be able to see it, but it will stabilize the panel.
Locking Your Door
Since you cannot lock your sliding glass door to the panel, we have provided you with a sliding door clamp lock to secure your home.
Installing the sliding door clamp:
This clamp as a screw that tightens by hand to prevent the sliding door from moving beyond the clamp's placement. For doors manufactured with the glass slider on the inside track, the lock can usually be installed on the door's raised track.
If you aren't able to use the lock that comes with the panel:
A great alternative to locking your sliding glass door is a Charley bar or dowel. Both block the slider from opening. When engaged, you cannot pull the sliding door away from the pet door panel.
Videos
How to Measure Your Sliding Glass Door for a Pet Door
How to Adjust Your Endura Flap Magnet Strength
FAQ
|
Is this the same as the Thermo Panel 3e? This is very similar in that it has the same height ranges, flap sizes, Endura Flap, and Low-e glass. However this one is specifically made to fit better in the wider vinyl slider tracks. |
|
Will this fit all vinyl doors? This will work in doors that have a recessed track at least 1 1/2" wide, with a rail in the bottom that is about the size of a pencil. The panel is made with a small channel that will case over that little rail |
|
Does it lock? We do include a c-clamp lock. It is not designed to mate with your existing sliding door lock. You can also use a Charley-Bar or dowel in the track. |
|
Can I install it myself? It is meant to easily be put in and removed. You just have to loosen the screws at the top, fit it into the track, and then tighten them. Then to remove it you simply loosen them again and pop it out. |
|
If you can remove it what prevents intruders from taking it out? The thumb screws are on the inside of the house so you can't loosen them from the outside. |
|
Can you lock the pet door? It comes with a closing cover, and you slide that in on the inside of the house. It is a very secure ABS plastic material that is as strong as a 16 gauge steel. |
|
Does this insulate well? This door has superior insulating capabilities! The flap has magnets that seal all the way around, and will stay closed in wind gusts up to 50mph. The Low-e glass also compliments the insulating value of you new vinyl door. It is our #1 recommendation for extreme climates. |
|
What does the recommended pet height mean? That column is what we recommend be the range of pet height that would be suitable for that particular flap size. So for example if you pet is 20"tall and could fit though a 10" wide opening, then you could go with the large flap. |
|
How to I measure for it? You will want to measure from the deepest part (down past the little metal rail) in the bottom, then all the way up to the deepest part inside the top track. |
|
Does it come in any color other than white? No, but the you can paint the vinyl to match. |
|
What if my track is wider than 1 1/2"? It can still work if your track is wider, but if the channel in the bottom, top, or side measures less than that you will not be able to fit it into place properly. |
|
Does your door have to be vinyl? No, not as long as the track height and width meet the panel specs. |
|
What are some breeds of dogs these will fit? Small would be Chihuahuas, Yorkies, and cats. Medium would be good for Corgis, Jack Russell Terriers, and French Bulldogs. Large would fit most Labs, Goldens, and Pit Bulls. Extra Large would be good for most Rottweilers, German Shepherds on the large side, and English Labs. |
|
Is the flap flexible? It is flexible, but since it is two pieces sandwiched together it is a little stiffer and heavier than the more economical vinyl flaps. |
|
Is the flap clear? It is a little foggy, but it is see through. |
|
Will this form condensation like the aluminum panels? Nope! That is one of the great things about the vinyl framing is you won't have the the condensation on the inside of the house. |
|
How do you replace the flap? Since this is really our door mount version of the Endura Flap installed onto our vinyl panel you would replace it much like you would one installed in a regular interior/exterior door. This means that you would drill out the hole plugs to remove the screws. Then pull off the flap assembly, switch out the flaps, and reinstall the door onto the panel. All of this can be done without removing the panel from the track. |
|
Is there an electronic version of this panel? We do hope to offer that option in the future, but right now we are offering only the Endura Flap options. |
|
My sliding door track has a triangular guide rail. Will this pet door still work? Some sliding glass door tracks have a triangle-shaped guide rail instead of a cylindrical pencil rail running along the middle. This pet door panel has an arch along the bottom that is designed to sit on top of a cylindrical pencil rail. Pencil rails are shorter in height than triangular guide rails, which means that the pet door panel would wobble on top of it rather than sitting flush with the rest of the track. To accommodate the pet door panel you will need to build up the sides of the triangular guide rail so that the tip is less than ¼” tall. Please reach out to customer service if you have any questions about this process. |
|
Will this panel work if my sliding glass door has a buried track? Some sliding glass doors have buried tracks. Since this panel has an arch along the bottom that is designed to sit on top of a pencil rail, it will not be secure in a slider with a buried track without modifications. We recommend securing the panel to the track wall with L brackets or toenailing it to the track wall. Toenailing is the process of fastening the panel to the track by driving a nail at roughly a 45-degree angle into the panel and through the track wall. Please note that these modifications result in a semi-permanent installation. If you needed to remove the panel in the future you would first have to remove the L brackets or nails. Additionally, please note that this process would leave holes in the pet door panel and it would no longer be returnable. Please reach out to customer service to further discuss your options for a buried track. |
|
I have a hurricane patio door. Will this pet door work for me? Hurricane door track styles vary widely, so they are case-by-case. Please reach out to customer service to discuss your pet door options for your sliding door. |
|
Will this pet door work with Anderson and Pella sliding doors? Anderson and Pella sliding glass doors have an inner track wall but no outer track wall. Additionally, the pencil rail is on the outer edge of the track rather than in the middle. Since this pet door panel is designed to sit between two track walls and on top of a centered pencil rail, it cannot be installed in Anderson or Pella doors without modifications. We recommend building out your track and using L brackets or toenailing to secure the bottom of the panel to the inner track wall. Building out the track means adding a piece of wood or vinyl that is the same height as the pencil rail to the space next to the pencil rail. This creates a flat surface for the pet door panel to sit on. Next, you will need to secure the panel to the track wall. To do this, you can use L brackets or you can toenail the panel into the track wall. Toenailing is the process of fastening the panel to the track by driving a nail at roughly a 45-degree angle into the panel and through the track wall. Please note that these modifications result in a semi-permanent installation. If you needed to remove the panel in the future you would first have to remove the L brackets or nails. Additionally, please note that this process would leave holes in the pet door panel and it would no longer be returnable. Please reach out to customer service to further discuss this process or different options for an Anderson or Pella sliding door. |
|
How much does shipping cost? Shipping is calculated at checkout. |
Warranty
Warranty Type: Lifetime
Duration: Lifetime of the product.
Coverage: Defects in materials and workmanship under standard regular use.
Exclusions:
Damage caused by misuse or not using the product as intended.
Improper installation.
Damage caused by chewing.